
One of the trends that has been floating around the crafty/home decor world lately are home-made apothecary jars. And why not? The real thing is really expensive, and most of us can’t justify that cost for a little decor when we can do it ourselves for almost-free. But, some of the variations I have seen were lacking something for me.
Real jars vary in their height and size. Most of the DIY jars use candle sticks for the base, so they can’t really be any shorter or longer. Also, real jars have lids. Usually knobbly lids with a nice round handle on top. Again, the DIY versions often use vases for the vessel, and thus are lid-less.
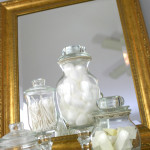
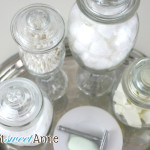
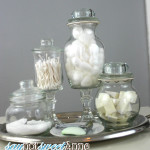
Not any more! I scoured The Dollar Tree, interchanging parts from one thing to another, stacking vases onto lids onto jars to see exactly what my options were. Using what I learned from my Dollar Store Candy Bar post, For under $10 in glass and some E-6000 glue, I have some apothecary jars that I am proud of. They are all shiny, reflective glass with varying height and lids. What do you think?
I’m in the process of buying a house- and I’ve already got these earmarked for our new bathroom. ♥
What I used:


- Large Glass Vase (1)
- Medium Glass candle holder (2)
- Pack of 2 glass tealight holders (4)
- 2 clamp sealing jars (3)
- 2 ribbed/lidded jars (7)
- Scalloped edge vase (6)
- Two taper holders (5)
- E-6000 glue
How To Make It:
- First thing is first, remove all those white stickers. I did this with a razor blade and followed up with some nail polish remover.
- Make your lids. For me, that involved removing the lids from the clamp jars (3). (I just used some pliers to un-do the wire) And then gluing one of the tea light holders (4) to it.
For gluing:make sure to prep both surfaces with alcohol to ensure no oils to prevent bonding. Follow the instructions on your glue.
The lid from this jar… 
With this tea light holder glued on top… 
Became this lid! Once this lid was dry, I plopped it onto the scalloped vase (6) and voila! One of my jars was already done! This is my 2nd shorted jar in the set (Remember how I wanted varying height?) I made another lid in this same manner, and set it aside.
- Next for the tall jars. This was really easy. I just glued one of the candle sticks (5) to the bottom of the large vase (1) and the medium candle holder (2). The large vase is my tallest apothecary jar. I got the second lid that I made, popped it on top and it was done!


- The medium candle holder, now with its glued on base, becomes the second tallest height in the set. It needed a lid though, so… I cheated on this one and simply swiped the lid off of the ribbed jar (7). It fit well and already has a pretty glass knob.


- Finally, for the shortest jar in the collection, I went back for the bottom of one of those clamped jars (3). I paired the bottom with the lid from the other ribbed jar (7), and done! Four totally new creations all from Dollar Store items!


Kayla Domeyer
Latest posts by Kayla Domeyer (see all)
- Miniature Bohemian Style 1:12 Dollhouse Rattan Shelf - August 24, 2023
- How to Solve Stress with Princess Bathtub Melts - June 2, 2020
- 25 Valentines Even a Toddler Can Make - February 11, 2020
This is an extremely creative ideas and unique!
I will apply your initiative in my bathroom where there are many mirrors and light. Oh! I think my bathroom will be sparkling.
Thanks for your great sharing!
i absolutely love this. I’m a Dollar Tree fanatic so I can’t wait to do this for our guest bathroom. Question, where did you find the scoop to go in the Epsom salt? Is it just a metal measuring spoon or something?
It is totally just a metal tablespoon from a thrift store. =P I keep a collection of old trinkets like that.
I would love to know where you got jar number 7. I know Dollar Tree sold them for while but I can’t find them anywhere on the site. If you sell them I’ll buy them.
These are all beautiful ideas and all these jars can be used for so much.
Hey Van,
I got all of the items pictured at the Dollar Tree. Check around to different locations in your area. In my area each store has slightly different stock. You could also go to a thrift store with your would-be lids and keep sticking them on jars until you find one that fits! Hope that helps!
These are simply elegant and I love them!!!
I love the way you think & could not agree more. I’ve always thought the exact same thing about the DIY jars. Some of them are indeed, very pretty, but they lack that elegant ‘real’ look. This is perfect & has been pinned! Thanks for taking the time to figure it all out for us 🙂
Stacey recently posted..Shades of Green Dresser
Stacey, you are so welcome! It was a little bit of a chore, but now that I know what works with what its a lot easier. Recently, I’ve been going to thrift stores too- taking a big vase in and then wandering around trying different candle holders/lids on it from the knick knack aisle. I’ve made some pretty awesome larger versions this way. My hubby says I need to stop or we won’t have a place to put them all!
These are great! I love how you made lids.
I found you today thru the Linky Party at Terrific Tuesday, where I’m #68. I hope you get a chance to stop by my blog and leave a comment, too!
~ Megin of VMG206
What a great idea! You never cease to amaze me every time I read your blog! I love them!
Ha ha ha! I’m so glad you like them! Now I just need a decent looking bathroom to put them in…
So, I’m really loving these, and I can’t wait to try my hand at making my own. Great idea!!!
Erin @ @Wholly Delicious Dishes recently posted..Chocolate Covered Cherry Fluff Bars
These are so great! I’ve always loved the look of the high-end apothecary jars, but they’re so dang expensive. Thanks for the great tut!
Holly Waterfall recently posted..How Yoga has Helped me Love my Body
I’m glad you like them! I just picked up a couple thrift store things to make more. My hubby keeps asking me where I’m going to put them!!
I LOVE these!! I always stop and stare at the HUGE apothocary jars at Home Goods, Hobby lobby, Michaels etc wondering where I could put them and how high I can keep them away from my kids so they don’t break! ha ha
Shanna@ pineapple and coconut recently posted..Gluten Free Meyer Lemon and Blueberry Pancakes