It started with a gift. About 2 years ago I was gifted a book. It was from a local sale and had been decorated with polymer clay to look vaguely bird and/or dragon-ish.
I knew immediately what I wanted to do with it.
Girdle books were a medieval book (usually a bible) where the leather cover was left long and then knotted to allow for the book to hang at the waist. I wanted to make this into a prop spell book that would hang in a similar way for a LARP Historian character I play.
So to start I tore off all the less-than-secure polymer bits, and then used a flexible polymer clay to re-sculpt more realistic dragon scales.

I made the texture using small circle cutters on top of plastic wrap, which gives a bubbled sort of effect. I used images of lizards for inspiration but took some liberties because, dragon. Once baked I painted the whole thing and covered it with a few layers of lacquer. The dragon is green because in the lore of the book, it is a hoarder of knowledge – and that means green/covetous.


I adorned the book with some leather bits “riveted” in place with paper brads, some metal book corners and a snap to hold the whole thing shut. Then I glued some leather onto the insides of the covers and voila! Iteration #1 was complete.


The Second Time Around
I wore that book, as that character roughly 20 times like that. However – for those of you in a LARP you will know this – being outside in all weather for 12+ hours each run is hard wearing on a book. The original book’s cover was made of chipboard (as most modern books are) which allowed too much flex for the polymer clay eyeball and left it cracking. Additionally, the binding had come loose from the textblock, and those very pretty book corners were stabbing my thighs with every step!


It was time for a redo.
What I used
- Thin green leather
- Polymer Clay
- Bake and Bond
- Waterbased wallpaper paste
- Wood and wood filler
- Leather paint, conditioner, and surfacing tools
- Heavy clamps, snaps, and other leather items
I started by pulling the whole thing apart.
I peeled the eyeball sculpture off of the cover as best I could, then broke off all of the pieces that were too thin. I cut 2 new cover boards out of 3mm pine plywood, and used Bake and Bond to bake the sculpture to the new cover. My hope is that with this more secure footing the polymer clay won’t crack like it had. Then I repaired the cracks with more polymer clay. Once all of that had been baked, I used a rough sandpaper to smooth the edges of the sculpture so that it feathered more subtly into the wood. This is very important, because I want this version to look much more like a dragon was made into a book, and I’ll be leveraging leather to do that.

Next came some book repair. I’ve done this a couple of times in school, but this WikiHow article is a good guide for those of you wanting to do this yourself. The original blank book is in signatures which were then glued together with a piece of paper, which was in turn glued to the covers. This is pretty typical of mass book making and while the materials and machines have changed the method is a very old one. Since one side of the text block had already torn away from the front cover, I only had to cut the other side and then gently wet/scrape off as much of that glued-on paper as I could.

Once that was done, I created new “shoulders” (The green bits that will stick up from the text block) and prepared new endpapers with a heavier stock to glue back to my new covers when it is time. I used a waterbased walpaper paste to glue a strong woven linen to the text block, overlapping the end papers by a wide margin to reinforce the folding parts.

While I let that dry, it was back to the cover. I knew I wanted a very shapely cover, with details embossed claws that would stick up higher than the eye to protect it. So, I drew some claw shapes and cut them out with my laser cutter. Since I can only cut up to 5mm plywood I had to layer them up to get the depth I was looking for. Then I used even more polymer clay to round out the knuckles in particular, baking it all and then gluing to the covers.

Right about here I wondered if I had the skillset to do the rest of the project. However, armed – as ever – with my own curiosity I set out to find out. I roughly measured where the leather would overlay the eyeball, and made sure I had plenty of room to cover the two covers before I started cutting. I traced a perfect circle, and then several “bites” out of that circle to serve as a transition between the polymer clay sculpture and the green leather. I slathered both the leather and the cover in the wallpaper paste and went at it!
I paid very close attention to the knuckles and embossed areas, making sure to press and work the leather into the crevices. The wallpaper paste dries slowly, which was a blessing and a curse. Blessing because it gave me time to work, curse because I had to use all manner of clips and clamps to hold areas where I needed them while they dried.

Slowly I worked my way around the cover, over the leather strapping detail, and to the back cover. I kept all of the extra loose just in case I needed it to adjust something later.

Once I had all of the leather where I wanted it, I came back in with leather paints (Angelus brand) and painted texture to blend the true-green color of the sculpture to the slightly more blue green of the leather. I added some decorative brads to the strappy areas to give some dimension and also to hold the book off of any surface it was sitting on and protect my hard work. 
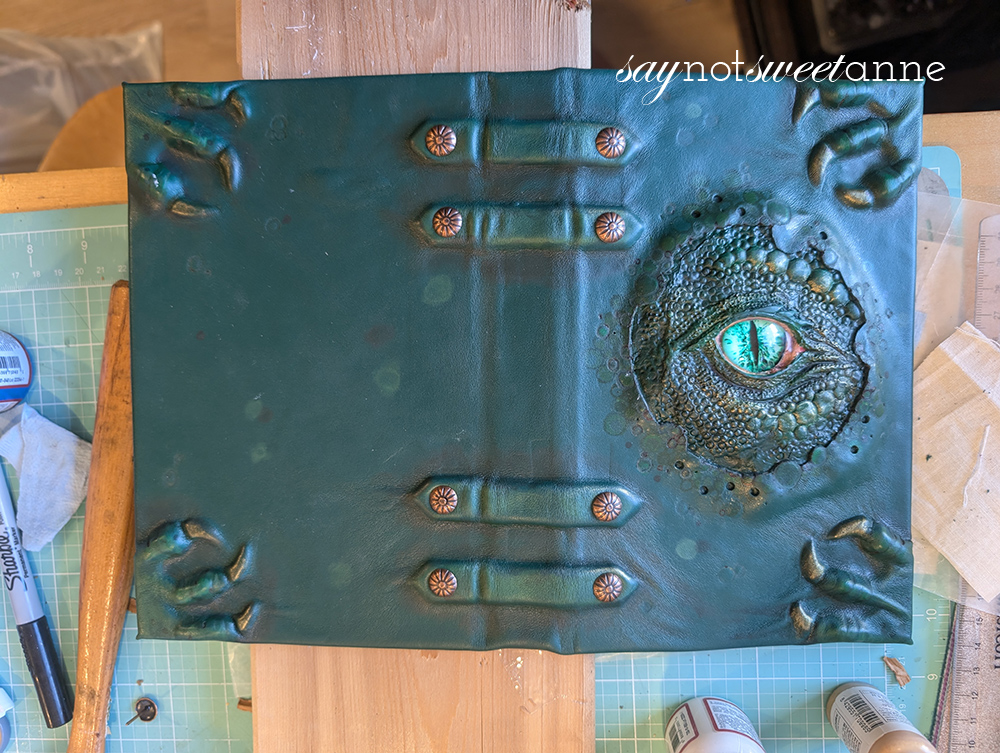
I went back in with some metallic paint, and then coated the whole cover in a leather sheen. Then, I made two matching leather straps and riveted some metal snaps to the cover so that I can hold it closed while it is hanging from my belt.
All that was left was gluing the long leather “wing” bit which will hang from my belt to the inside cover, and then gluing the end pages of the text block to the cover. I ended up using a different type of scrap leather, and stamping it with some dye ink to make it patterned on the inside after two years of using a knot to keep the book tucked in my belt, I opted for a loop that I can thread onto my belt so nothing falls when I’m running or stooping.


And that is it! I now have a functional prop book made of sturdy wood, leather, and rivets which hangs wonderfully at my belt and looks very cool. 🙂
Kayla Domeyer
Latest posts by Kayla Domeyer (see all)
- Miniature Bohemian Style 1:12 Dollhouse Rattan Shelf - August 24, 2023
- How I made a DIY Prop Dragon Book (Twice!) - March 20, 2023
- How to Solve Stress with Princess Bathtub Melts - June 2, 2020