
I love Ikea. There, I said it. I’m an Ikea-aholic. I live about 3 hours away from the nearest one, and still the Swedish design warehouse was the main source of furniture throughout my college years. The stuff was cheap, looked good, and lasted 3 moves.
Alas, as an adult, some of those great bargains aren’t quite as “upscale” as I would like my current aesthetic to be. Sadly, I’ve been forced to retire some of my acquired Ikea belongings. Among them are 3 Lack tables, a TV stand and some metal shelving.
There was one $10 Ikea lamp that I seriously considered trashing. It was the cheap plastic style “up light” that is popular with Walmart, Meijer and other back-to-school stores. IT was functional, but screamed “DORM ROOM” at the top of its little Ikea lungs.
Then I saw a post at Discovery Street shared on Sweet Sharing Monday. Suddenly, I thought this little lamp might get a new lease on life.
What I Used:
- Ikea (or other similar) lamp
- Dollar Store Wire Mesh waste basket
- Dollar store wire mesh pencil cup
- Fishing line (Monofilament)
- Large jump rings (jewelry findings)
- Wax Paper
- Iron
- Cutting Machine (can also be done with punches or circle cutter.)
- Wire snips
How To Make It:
- First, paint the wire mesh baskets white. I neglected to do this at the beginning and had to go back and try and paint AROUND the circles. Not fun times.
- Remove the bulbs from your lamp. This should allow you to remove the plastic “shades”.
- Using the hole in the original shade as a guide, cut out enough of the bottom of the mesh pieces to fit in the original shade’s place. Set Aside.


- Layer 2-4 sheets of wax paper on some newspaper. Use your iron on a very low setting, iron the paper. The wax between the paper will melt and create a layered, rather thick shell-looking material.

- Using the tool of your choice, cut 2-3in circles out of the material. I opted to let my Sillhouette Cameo do the hard work here- cutting around 400 circles.
- Using the monofilament, string as many of the circles together on a string as you need to go top to bottom of your upper shade. For me this was 6 circles a strand. I pierced the circles with a needle strung with the monofilament., I tied a knot after each circle so that they wouldn’t slide down the filament.

- One string at a time, fill up the tiers of your lamp. For me, I did 4 tiers, with each about 30 strands.

- Now that the top is done, let’s move onto the accent lamp. Since this one sits sideways most of the time, it wouldn’t work to do the filament trick. I was worried those strings would tablge with the movement this spotlight gets. So instead, I punched a hole in each circle and hooked it with a large jewelry “jump” ring.

- Using a similar tier methods, but with each tier only 1 circle, attach circles all over the accent lamp.
- Done!!


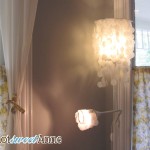
This lamp is my new favorite. It doesn’t look like it came from Ikea any more, but still serves the utilitarian purpose it always has. It has withstood countless cat fights that have sent it shaking and swaying. So far I’ve not lost any circles or had any noticeable tangles!


Kayla Domeyer
Latest posts by Kayla Domeyer (see all)
- Miniature Bohemian Style 1:12 Dollhouse Rattan Shelf - August 24, 2023
- How I made a DIY Prop Dragon Book (Twice!) - March 20, 2023
- How to Solve Stress with Princess Bathtub Melts - June 2, 2020
Love this idea. You may want to remove the discovery street link from the article though
Yikes! Thanks for the headsup Lucy!
AWESOME! Saw your tweet and saw this on IKEA hackers…you go girl! 😀
nice!! what a great redo!