
Oh my goodness. I can’t believe that it has been 2 years since I started blogging here at SayNotSweetAnne. This blog has grown to be a passion of mine, helping me to be creative and meet wonderful people along the way. I can’t express how joyous it is to be involved in this community. I recently revealed in my 2014 Printable Planner post that I am hoping to eventually transition to full time blogging. This place has so many possibilities, and I feel compelled to explore every one.
To celebrate, I’m so excited to share this beautiful guest post by my friend Ashley, and top it off with a $300 Amazon Gift Card giveaway! Be sure to sign up to win at the end of the post!

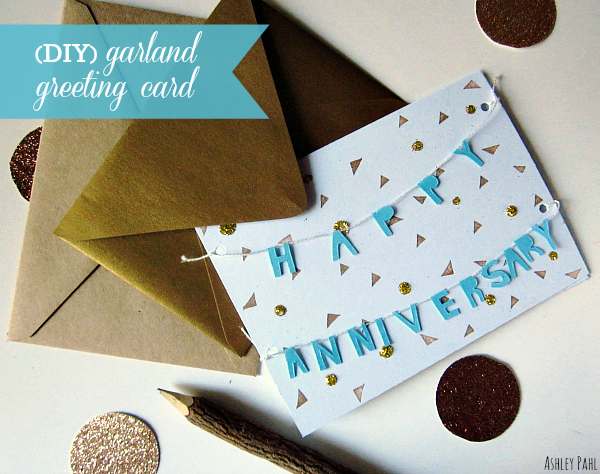
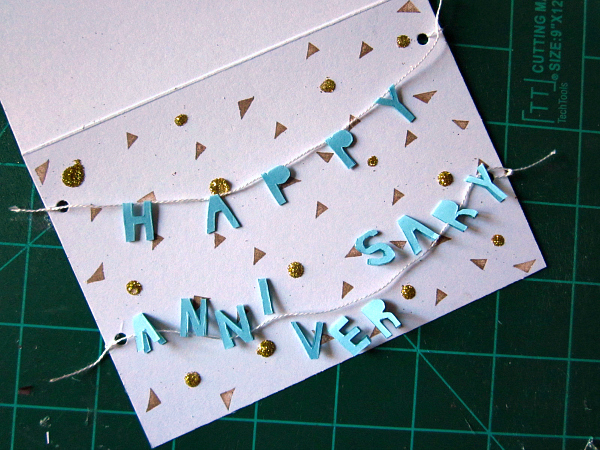
Hi there! I’m Ashley Pahl, the writer behind She Makes a Home. It’s such a pleasure to be guest posting on Say Not Sweet Anne – especially on such an important day! I was so honored when Kayla invited me to create a DIY post for her blog’s anniversary. I wanted to make something that was personalized for Say Not Sweet Anne, but also festive enough to fit the occasion. For that reason, I chose blue, brown, and a bit of sparkle, but you can create any color palette for your own card.
This garland card definitely works for an anniversary, but I also see it customized for birthdays, weddings, new babies, graduations, etc. The sky is the limit, so if you’re ready to make one, here we go!
Materials and Tools
- card stock for base of card (mine is 5.5″ x 4″ when folded)
- colored card stock or paper for lettering
- pencil
- kraft knife
- glue
- glitter
- carving block or vinyl eraser
- stamping ink
- glue
- thin string
- cutting mat
Directions
Start by marking little dots of glue around the front flap of the card. They can be as big or as little as you’d like, and as many of them as you’d like. Sprinkle with glitter, and let dry. Tap off excess glitter and return to glitter container.
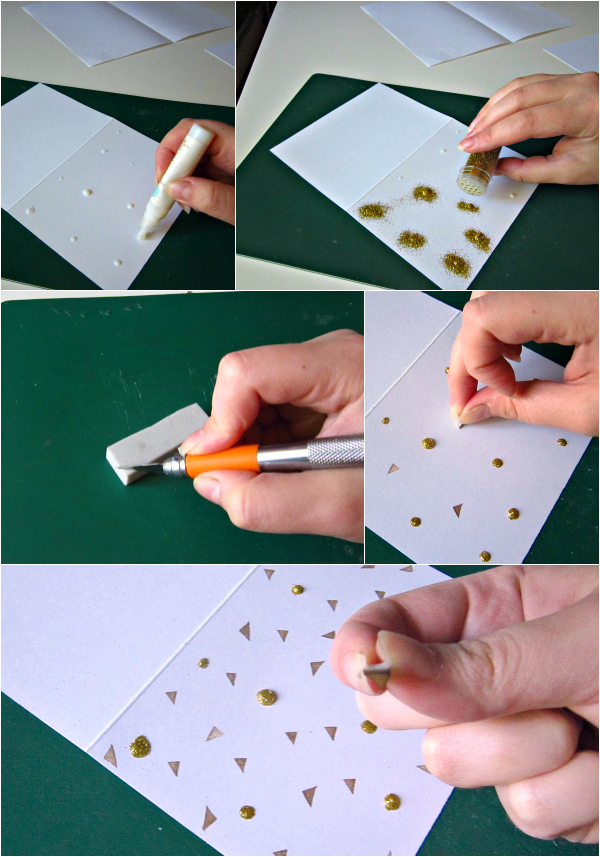
While your glitter “confetti” is drying, carve a little triangle stamp. I used a carving block, but you could use a vinyl eraser, or even the eraser on top of a No.2 pencil. Don’t stamp your triangle “confetti” until after you’ve tapped off the excess glitter.
Next, it’s time to cut out your lettering.
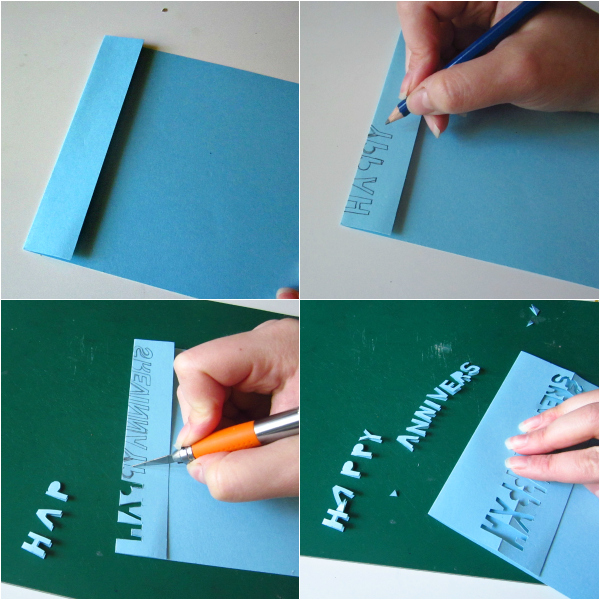
Fold your colored paper down about an inch. With a pencil, write out your phrase. I wrote my letters backwards because I didn’t want any pencil markings to show. If you run out of room, for your paper down again and start a new line.
Cut along your pencil markings through both layers of colored paper. Be careful not to cut the fold of the letters – you’ll want the letters to be able to hang over the string.
After your glitter dots are dry and your inked confetti is dry, it’s time to punch little holes in your card.
For each layer of garland you’ll be stringing, you need to cut two even holes – one on each side of the card. Next, cut your string. Cut your string to a length that’s longer than the width of your card so you have enough to tie, and enough to leave some slack for the garland. My card is 5.5″ wide, and I cut my string to 11″.
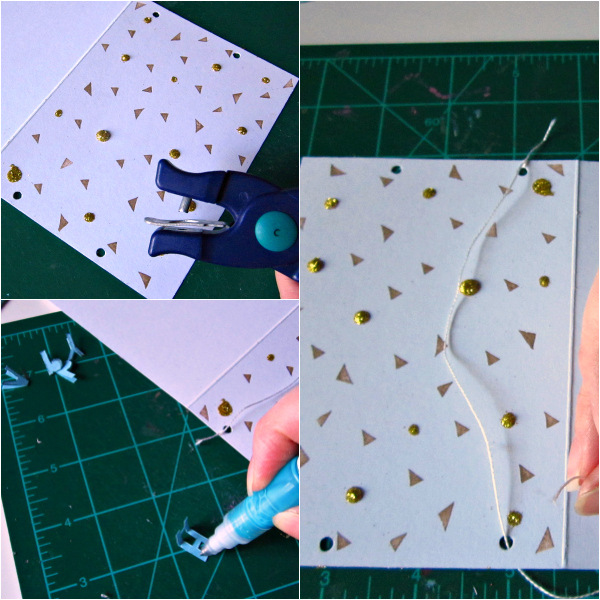
Tie one end of the string through one hole, followed by the other end on the other side. Before tying the final knot, make sure you have as much slack on the string as you’d like. Trim the ends of the knots.
Next, layout your lettering on the string the way you’ll want it.
To glue your letters to the string: Unfold a letter. On the inside of the letter, add a dot of glue in the fold, and a dot of glue and the base of the letter. Slip the letter over the string; close the letter, and hold it down for a few seconds to make sure it sticks. Repeat with the rest of your letters.
Allow your garland to dry. If you’d like, you can glue your garland down to the front of the card by adding a dot of glue to the back of the letters, or you can leave the garland loose like I did.

That’s all there is to it! I really enjoyed making this special anniversary card for Say Not Sweet Anne, and thank you so much to Kayla for having me on the blog. If you make your own garland card, or if you’d just like to say hello, please stop by She Makes a Home anytime!
Kayla Domeyer
Latest posts by Kayla Domeyer (see all)
- Miniature Bohemian Style 1:12 Dollhouse Rattan Shelf - August 24, 2023
- How I made a DIY Prop Dragon Book (Twice!) - March 20, 2023
- How to Solve Stress with Princess Bathtub Melts - June 2, 2020
Glad to be apart of this journey with you
Happy blogiversary! I hope to have one of my own some day. If I ever have a real blog, that is!
Congratulations on your second anniversary and thanks for the lovely giveaway opportunity! What a thoughtful way to celebrate your success!
Aww, I’m glad you think so! I would have given up long ago if it weren’t for kind, interested, uplifting people telling me they enjoy my musings. So thank you!
Congrats on your big 2 year. So glad I found you.
I don’t have nor want a facebook page at this time so I cannot enter you fabulous giveaway on this blog but wanted to extend my sincere congrads on your 2 year anniversary. I find your projects clearly explained and fresh in content. I hope to read you are celebrating your 3rd anniversary this time next year. Keep up the good work!
Happy 2 yr Blog Anniversary! I signed up for your Sweet Sharing Monday posts…looking forward to receiving them! Came here from Julie’s Eats and Treats.
Deb
Congrats on your 2nd Anniversary on your Blog!!! I know your are busting your buttons in gratitude!!!
Thanks for your kind words, Susan!
Thanks so much for your kind words!
Happy Anniversary !!! thanks for this giveaway 🙂
your blog recommended by yummy,healthy easy 🙂
A $300 amazon gift card would go a long way on my local no kill cat shelter’s amazon wish list for food and supplies – Karen
Oh my, I bet it would!! Go have everyone you know sign up!!
Happy Bloggy Anniversary Kayla!! Thanks for letting me be a part of your celebration!! 🙂
Jen Nikolaus recently posted..Say Not Sweet Anne – $300 Amazon Gift Card Giveaway!
Congrats Kayla to the happy big #2!!!
Raven J. True Blue Baking
Raven recently posted..~Red Velvet Mummy Cake~