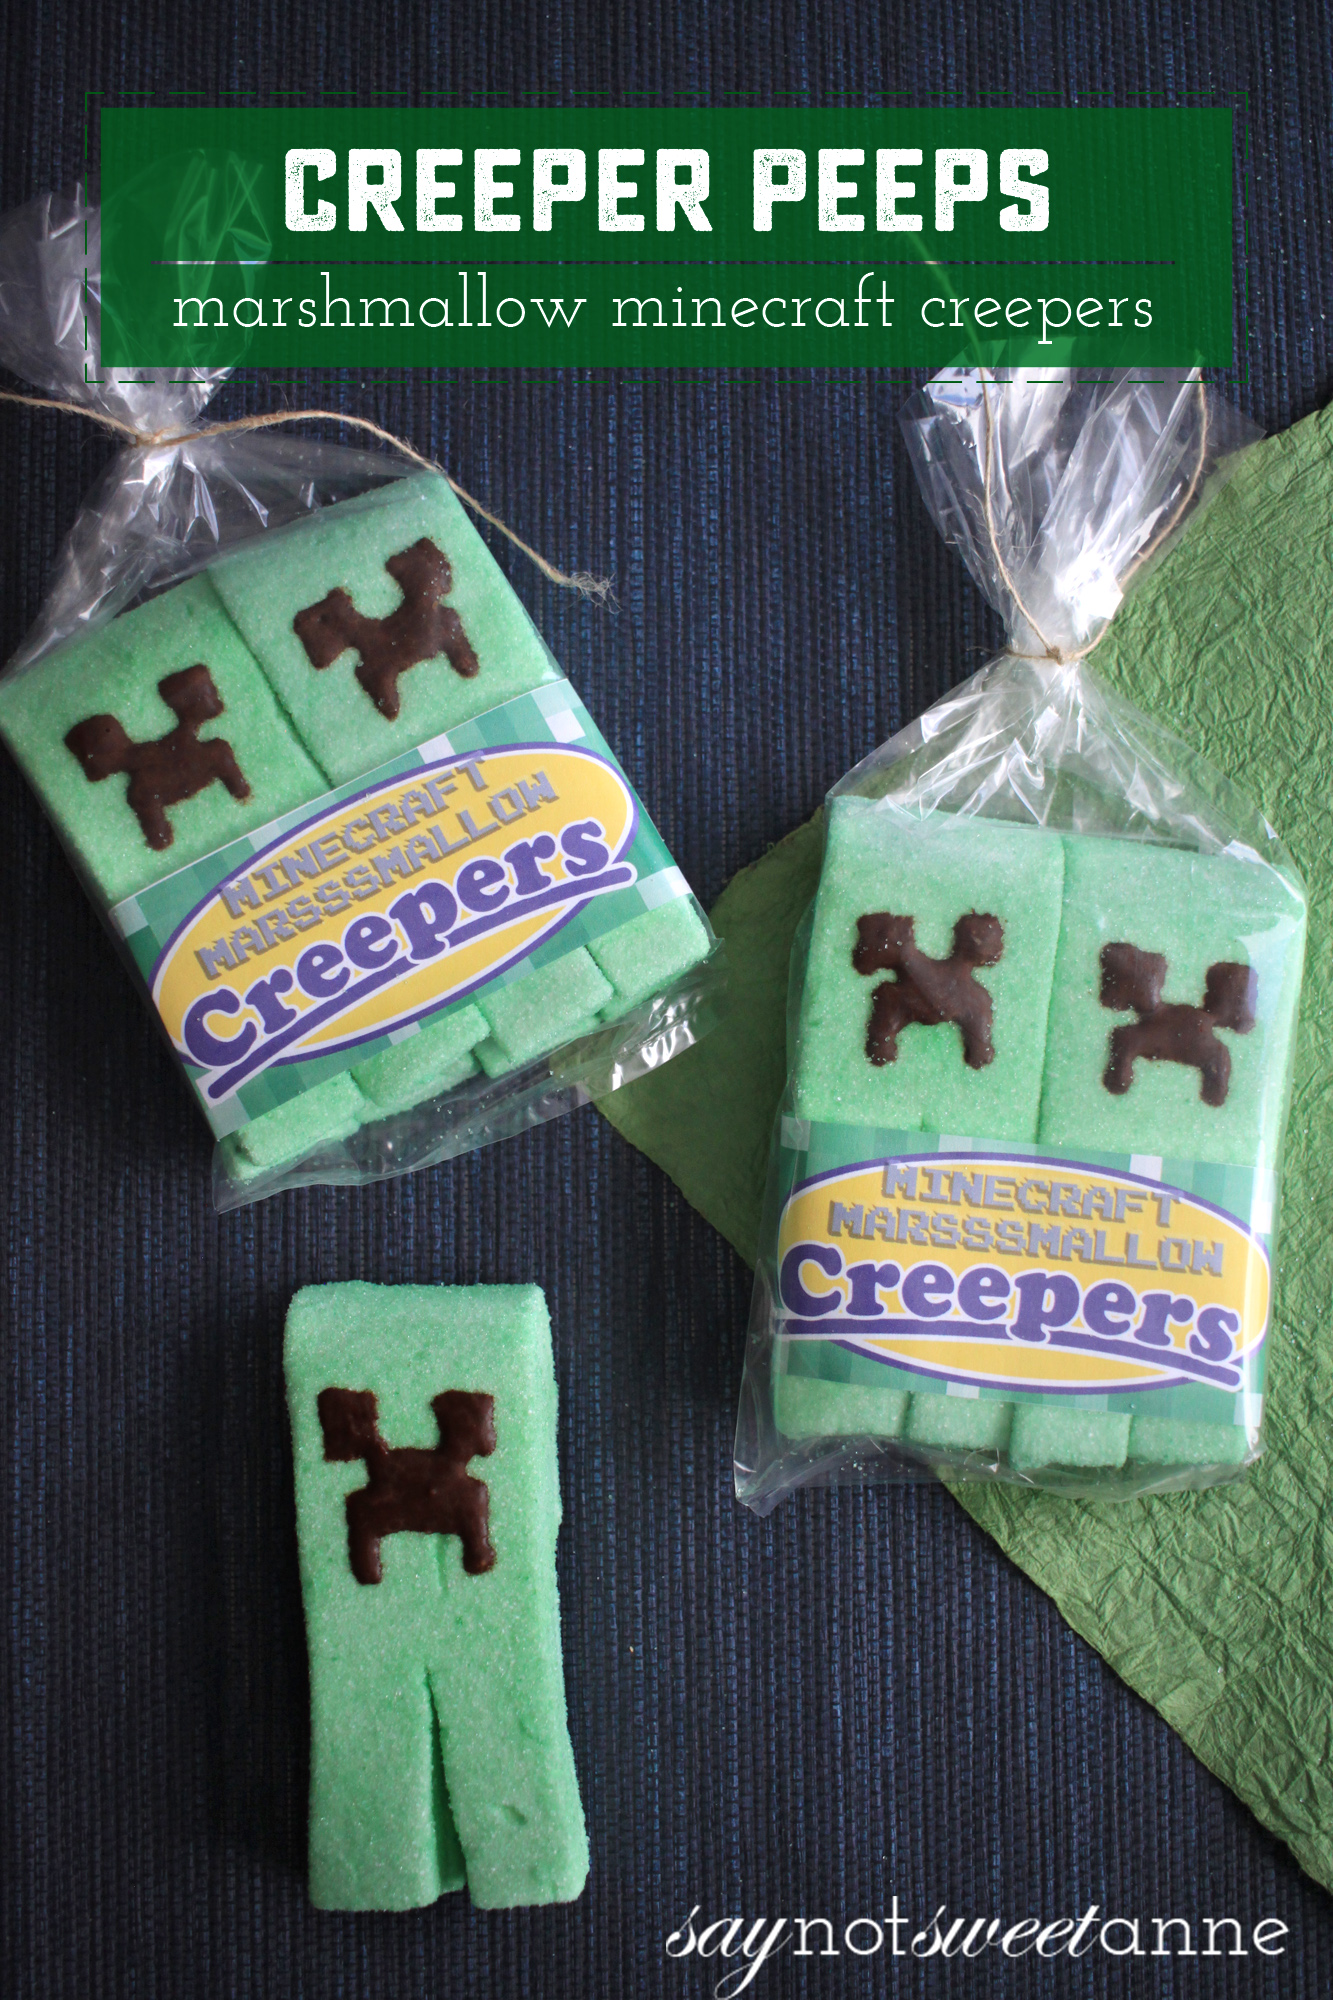
Last April fools day ThinkGeek pulled a prank about Marshmallow Creepers. These were Peeps that looked like Creepers from the popular indie game Minecraft. Well, needless to say it went over well, and people were sorely disappointed to discover that they could not actually purchase them.
For months I’ve been thinking about making my own marshmallows. So when I remembered these little guys , I knew just what to make! And let me tell you, these were so easy. All this time I was putting off making marshmallows because of the whole boiling sugar part. It was NO BIG DEAL!! So let’s get to it shall we?
Ingredients:
- 3/4 cup green Sugar (Make your own!)
- 3 packets of unflavored gelatin
- 1.5 cups of granulated white sugar
- 1 cup light corn syrup
- 1 cup cold water (divided)
- 1 tsp vanilla
- Stand mixer (This one is beautiful!)
- Free Printable Label

How to make Minecraft Creeper Marshmallows:
- Prep work is key here. Start by using a spray non stick coating to cover a 9×13 pan and the paddle of a rubber spatula.
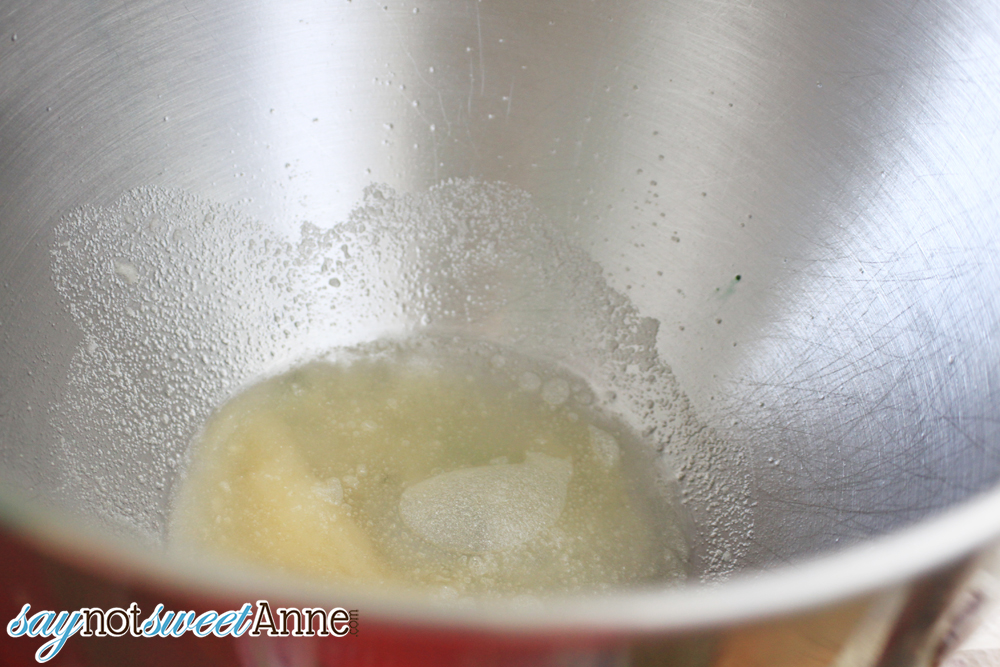
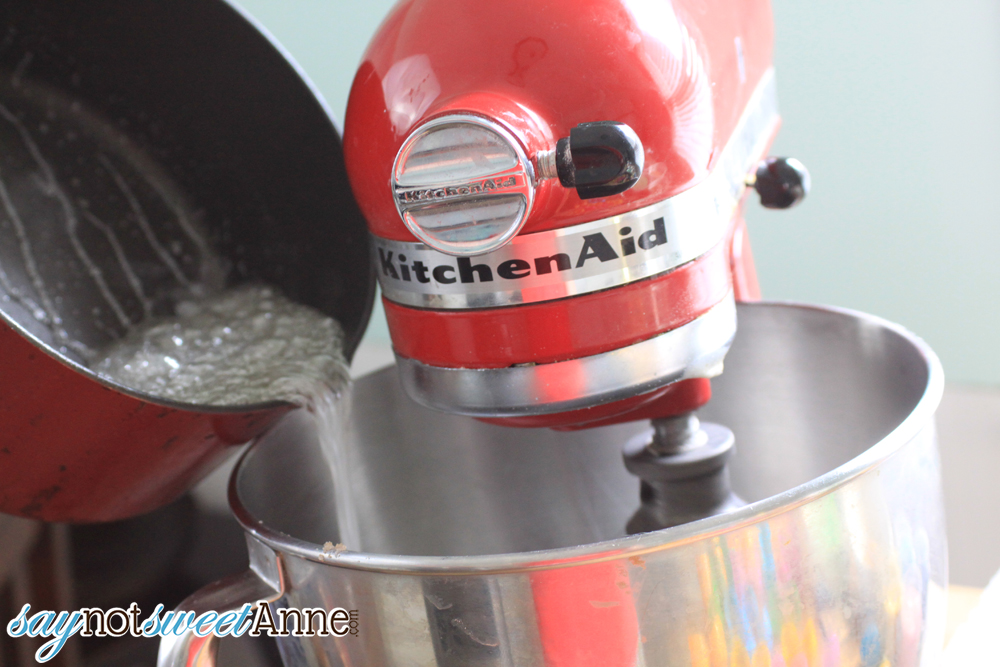
- Pour half of the cold water into the stand mixer bowl, and add the gelatin packets. I didn’t even stir.
- In a heavy bottom sauce pan, add the rest of the water, the sugar and corn syrup. Heat on medium high and stir until sugar dissolves, about 5 minutes. Use a candy thermometer and let the mixture come up to 240 degrees without stirring.


- Once the mixture comes to temp, move to the mixer. Turn the mixer on low with the whisk, and slowly pour the hot sugar mixture into the gelatin mixture. Once all if the melted sugar is in the mixing bowl, turn the mixer up to high.
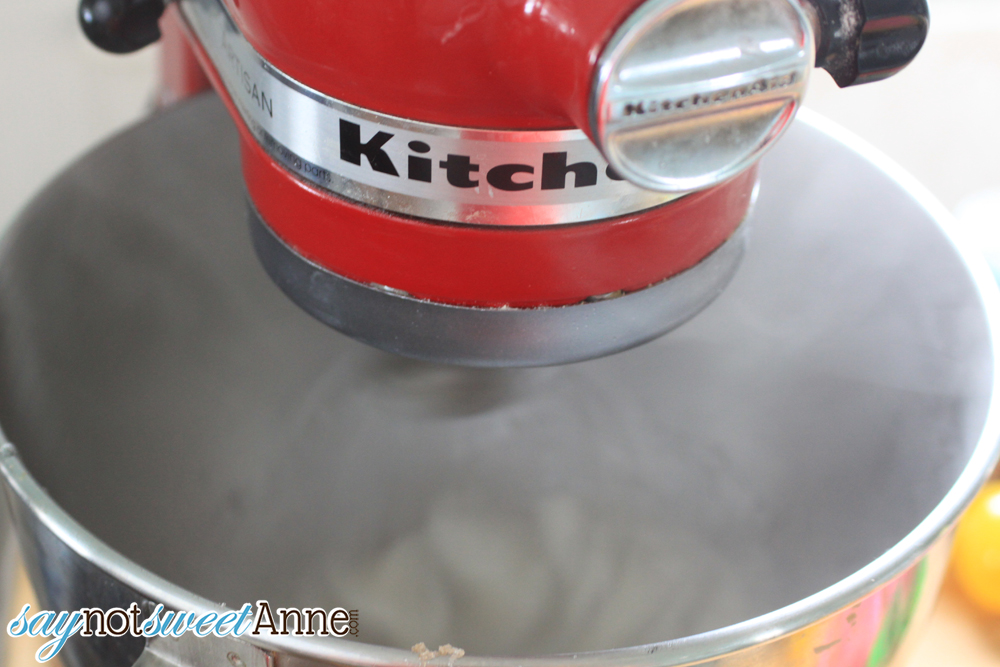
- Let mixture whip until thick and about triple in volume. For me it was 12 minutes. Add 1 tsp of vanilla to the mixture in the last minute of whisking.
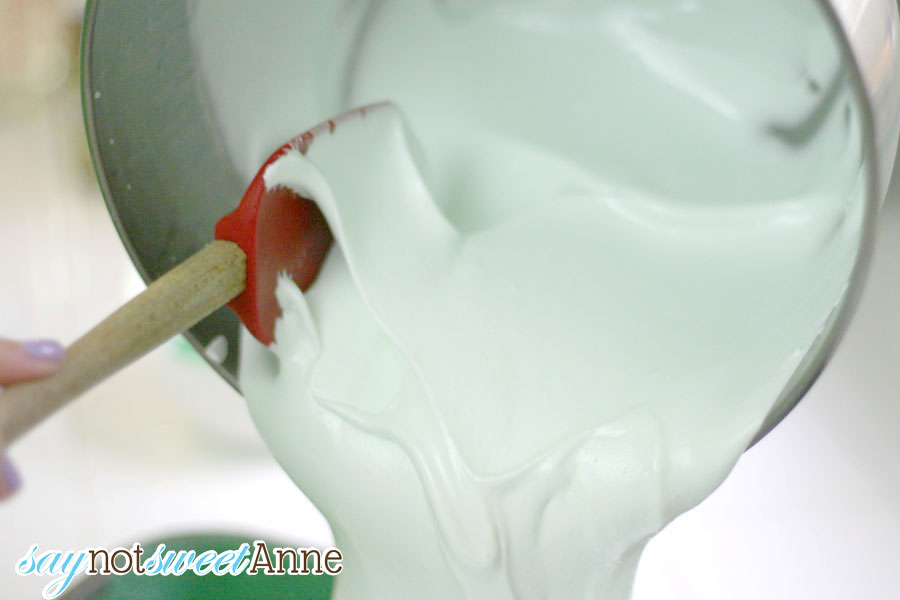
- Pour the mixture into your prepared pan, using the greased spatula to scoop it out and smooth the top.
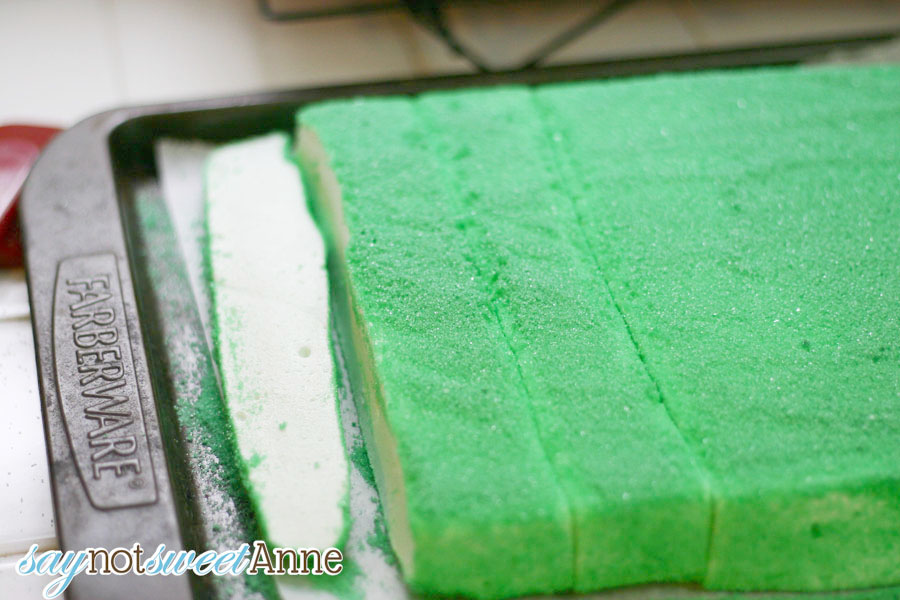
- Sprinkle some green sugar all over the top while it is still sticky, and leave it alone for at least an hour.

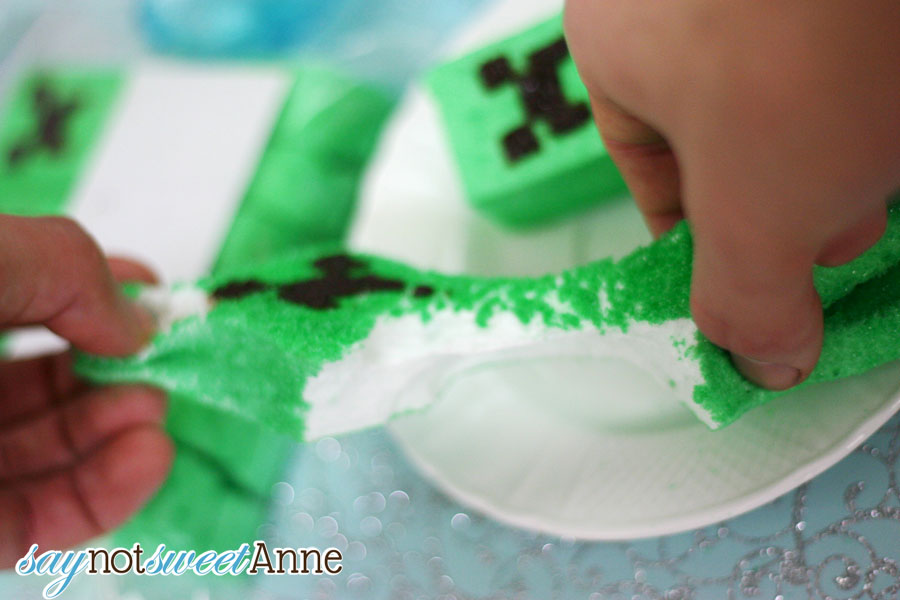
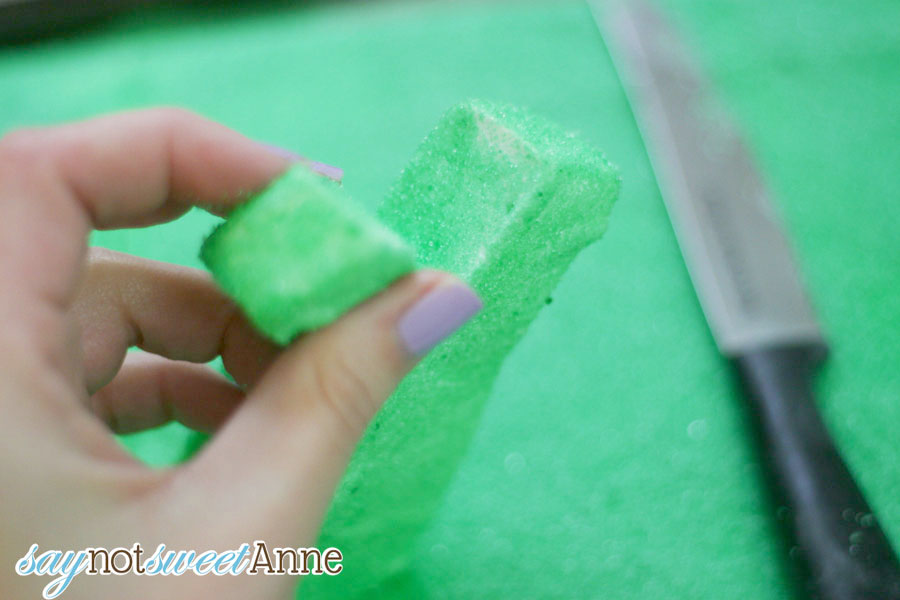
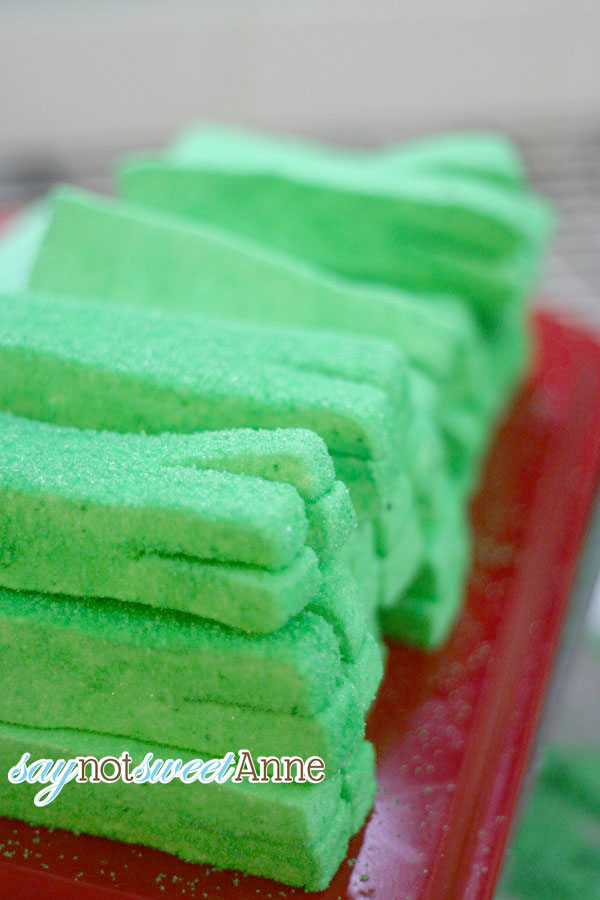
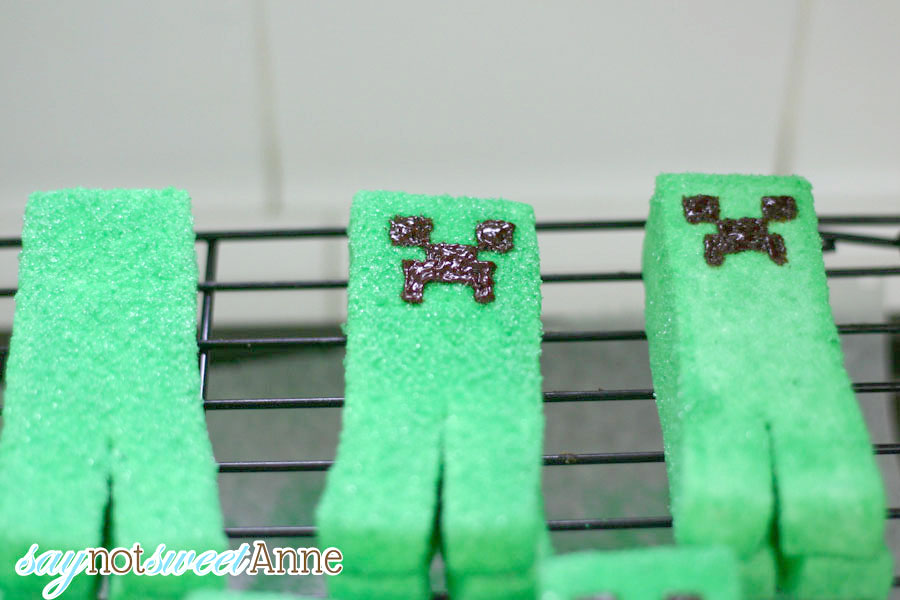
- After the marshmallows have cooled, turn the block out into a shallow cookie sheet (this will help you save the sugar) coat the rest of the sides in your sugar. Use a greased pizza cutter to cut it into long rectangle blocks about 3 times taller than they are wide. Coat the naked edges in the sugar.
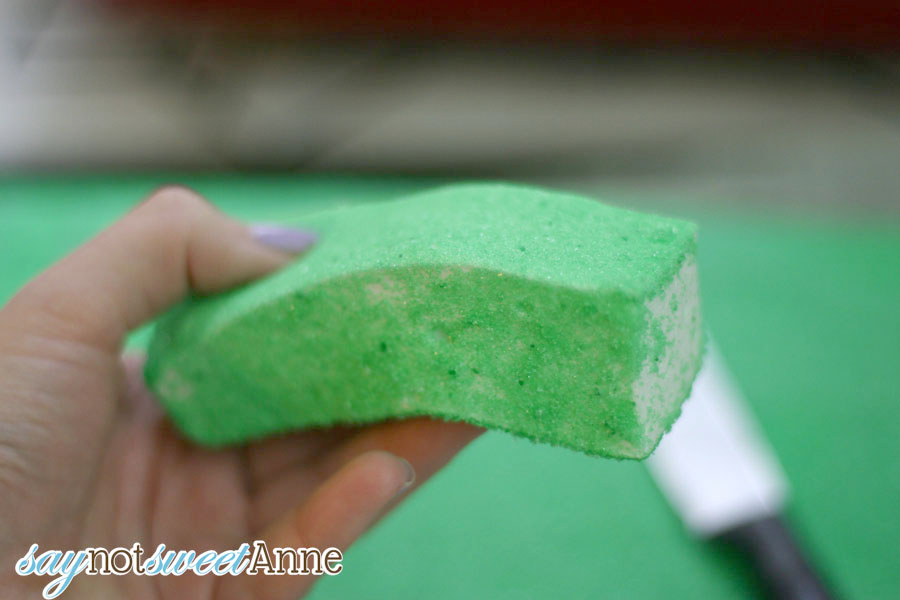
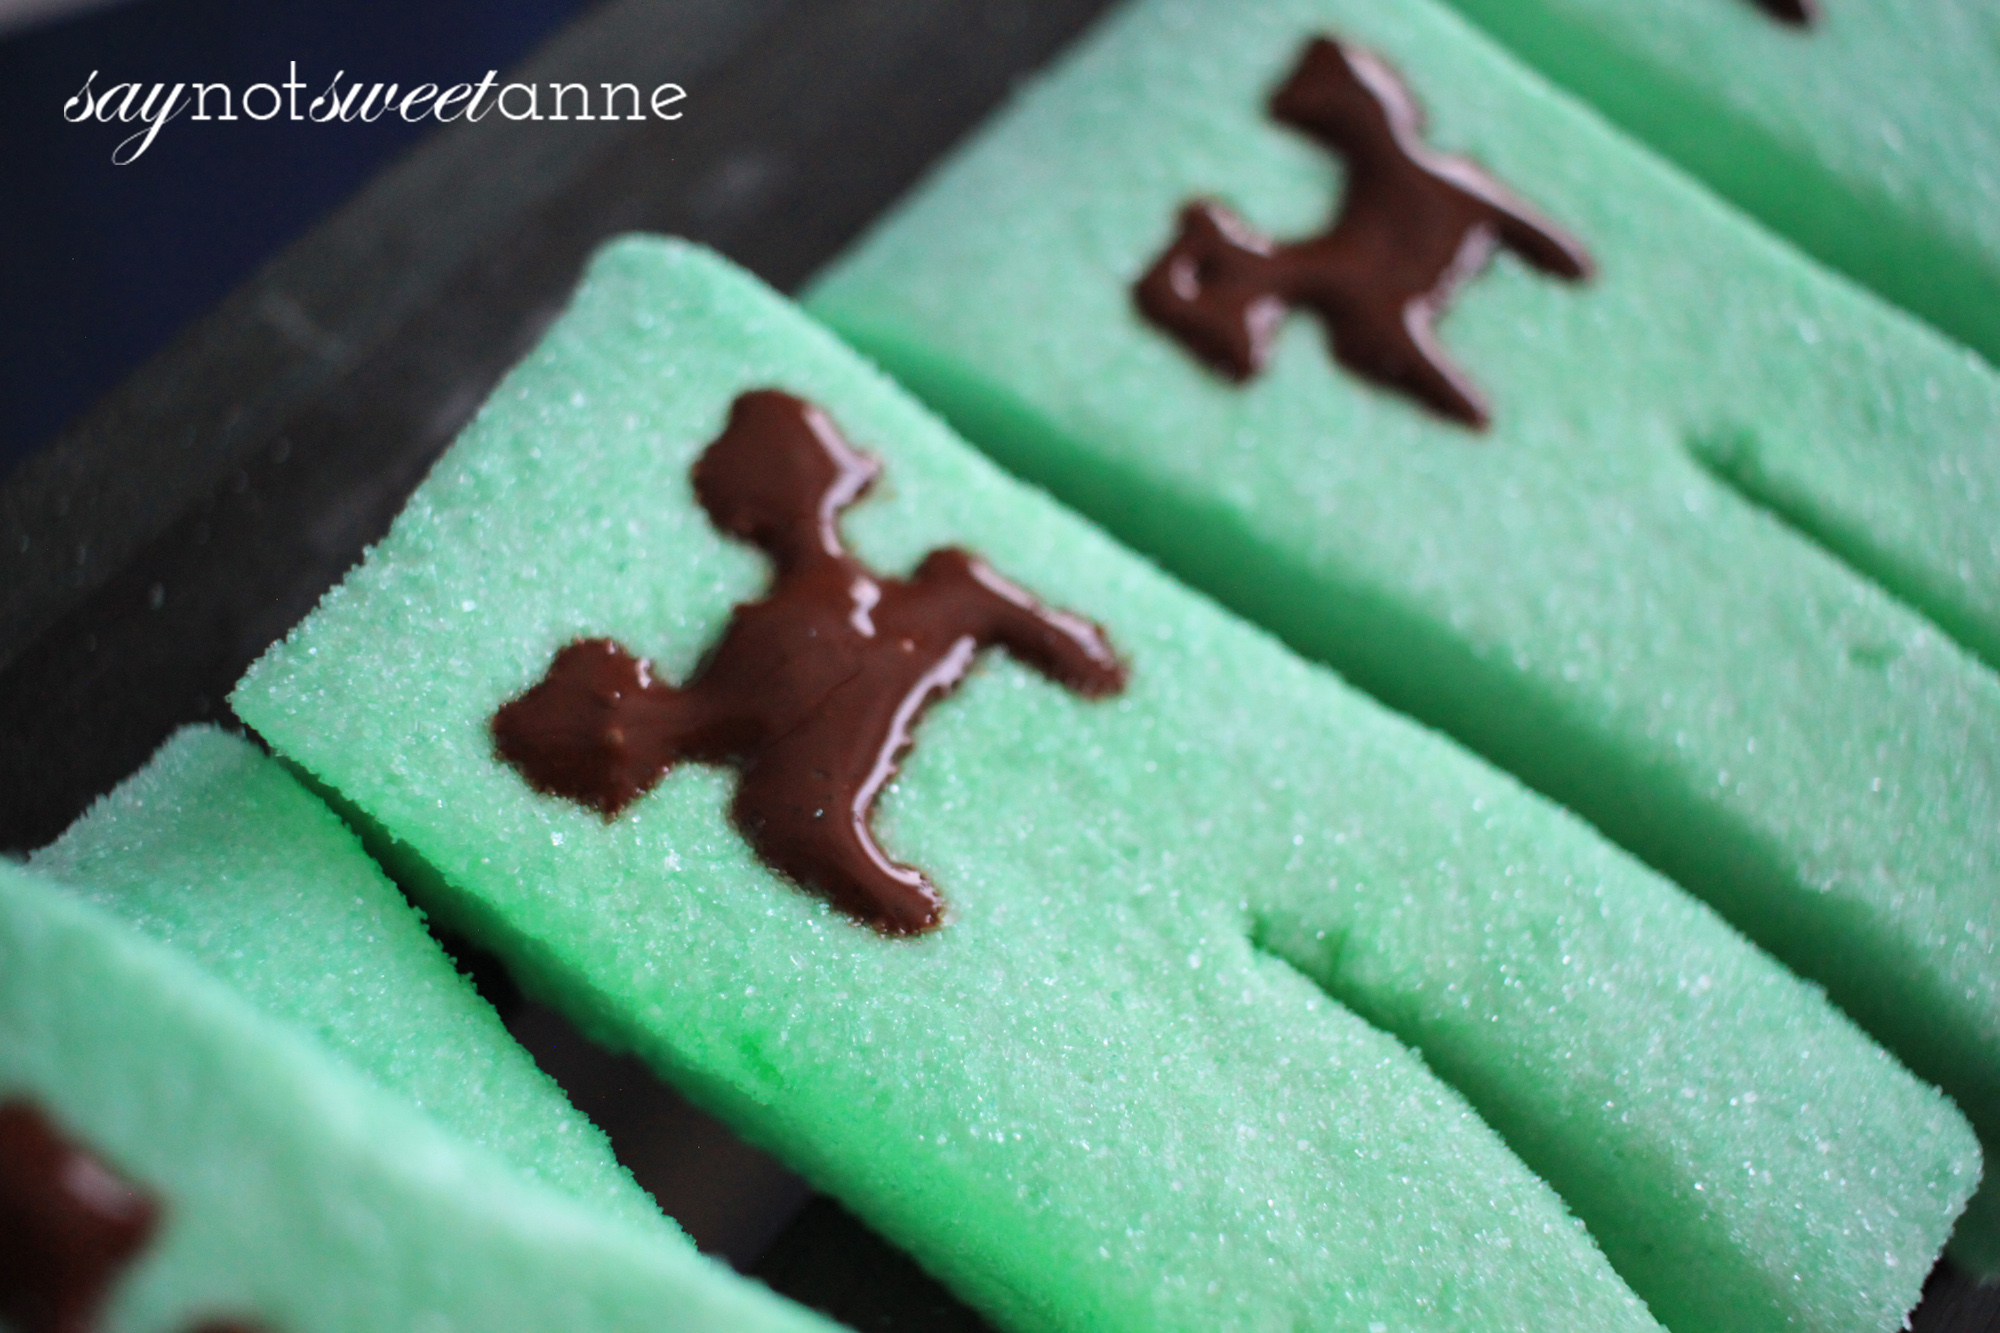
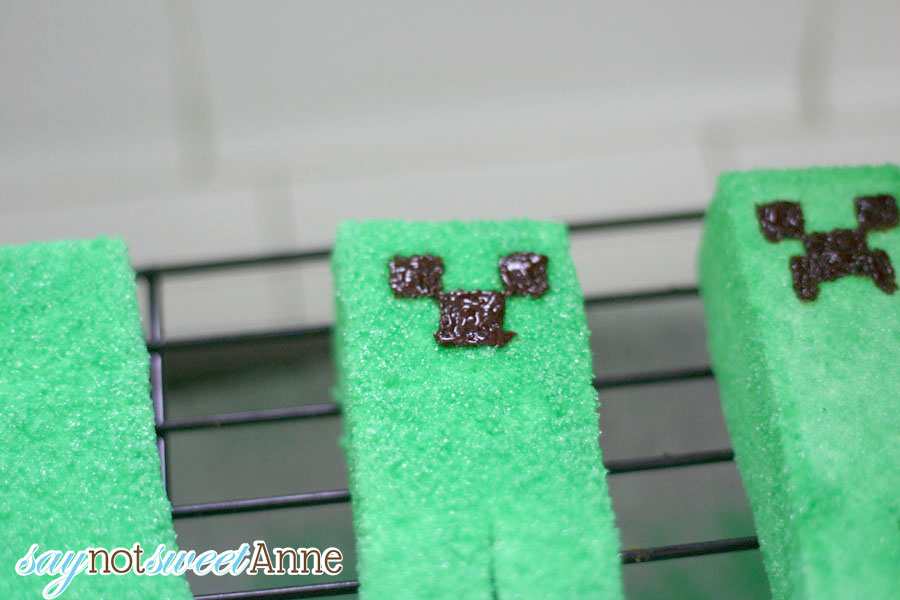
- With a greased knife, cut the legs of the creeper (there are 4), and dust the bare marshmallow with sugar.
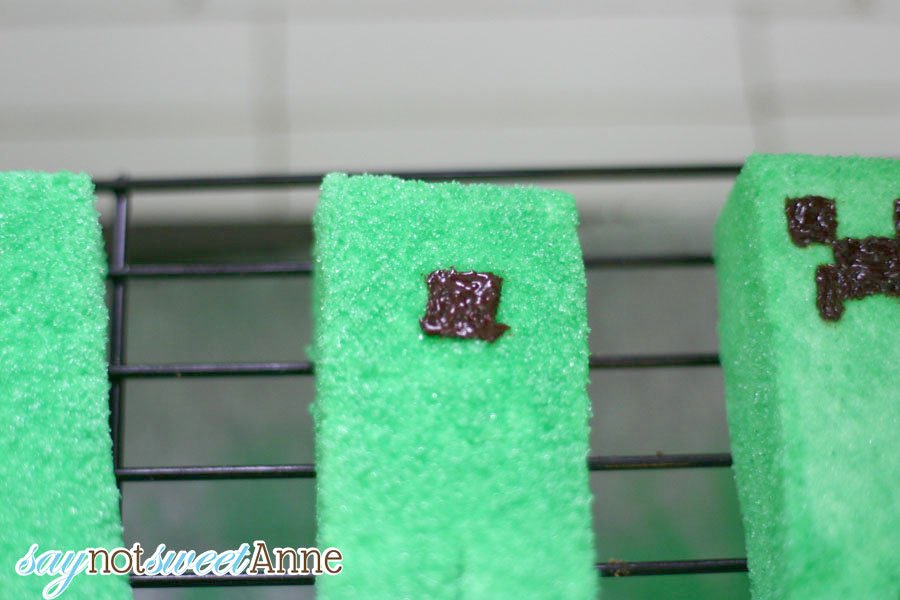
How to add Creeper Faces:
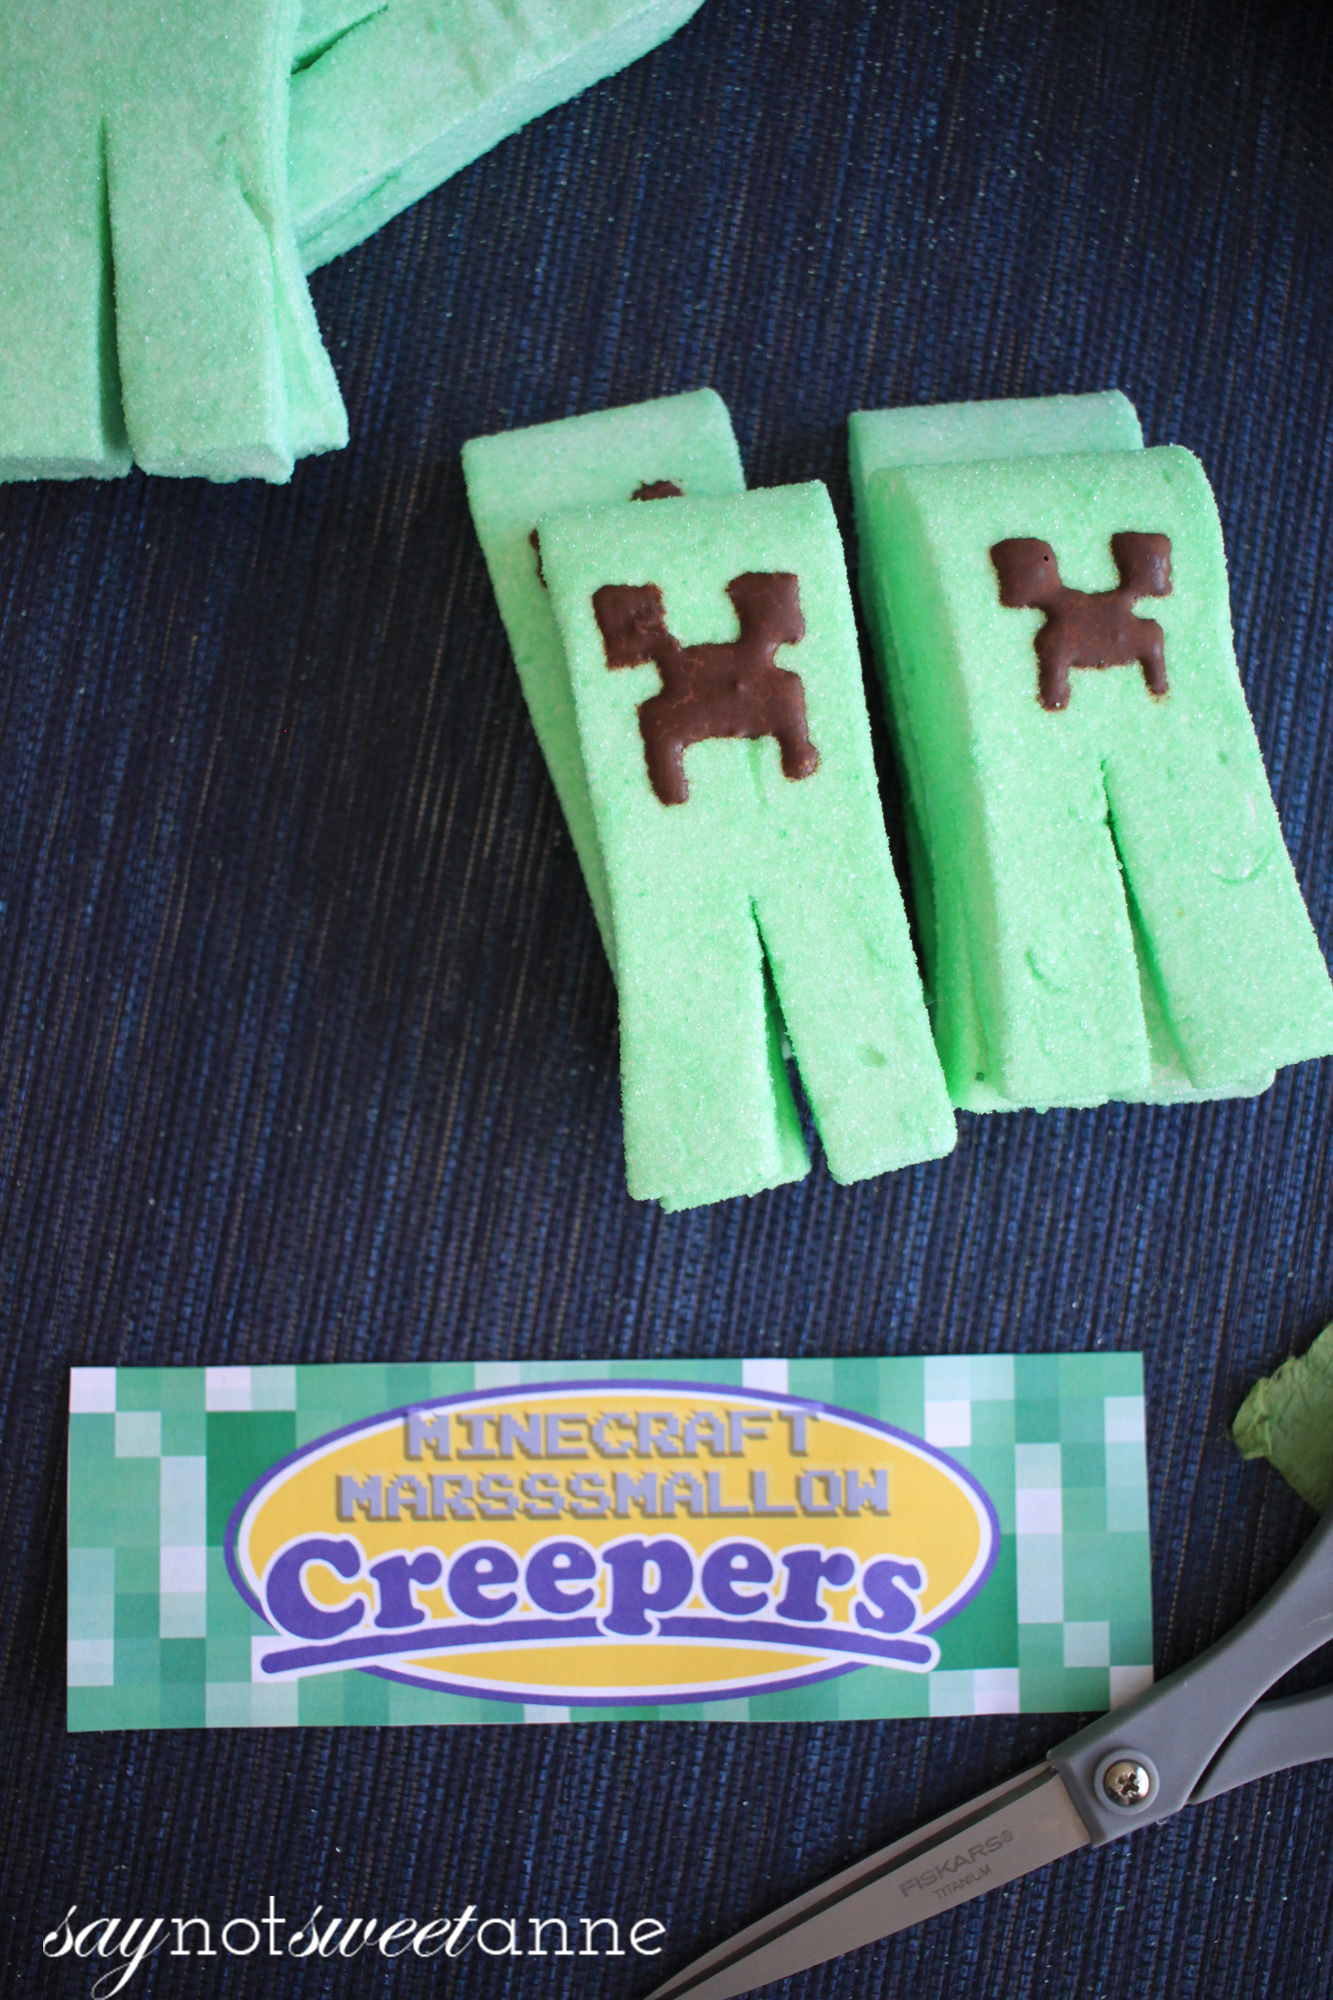
- After all of your bodies are ready, it’s time to do the faces! I used chocolate ganache (2tsp chocolate chips to 1tsp heavy cream melted in the microwave) and a toothpick to paint the squares. Start with the mouth, then the eyes, the the frown.
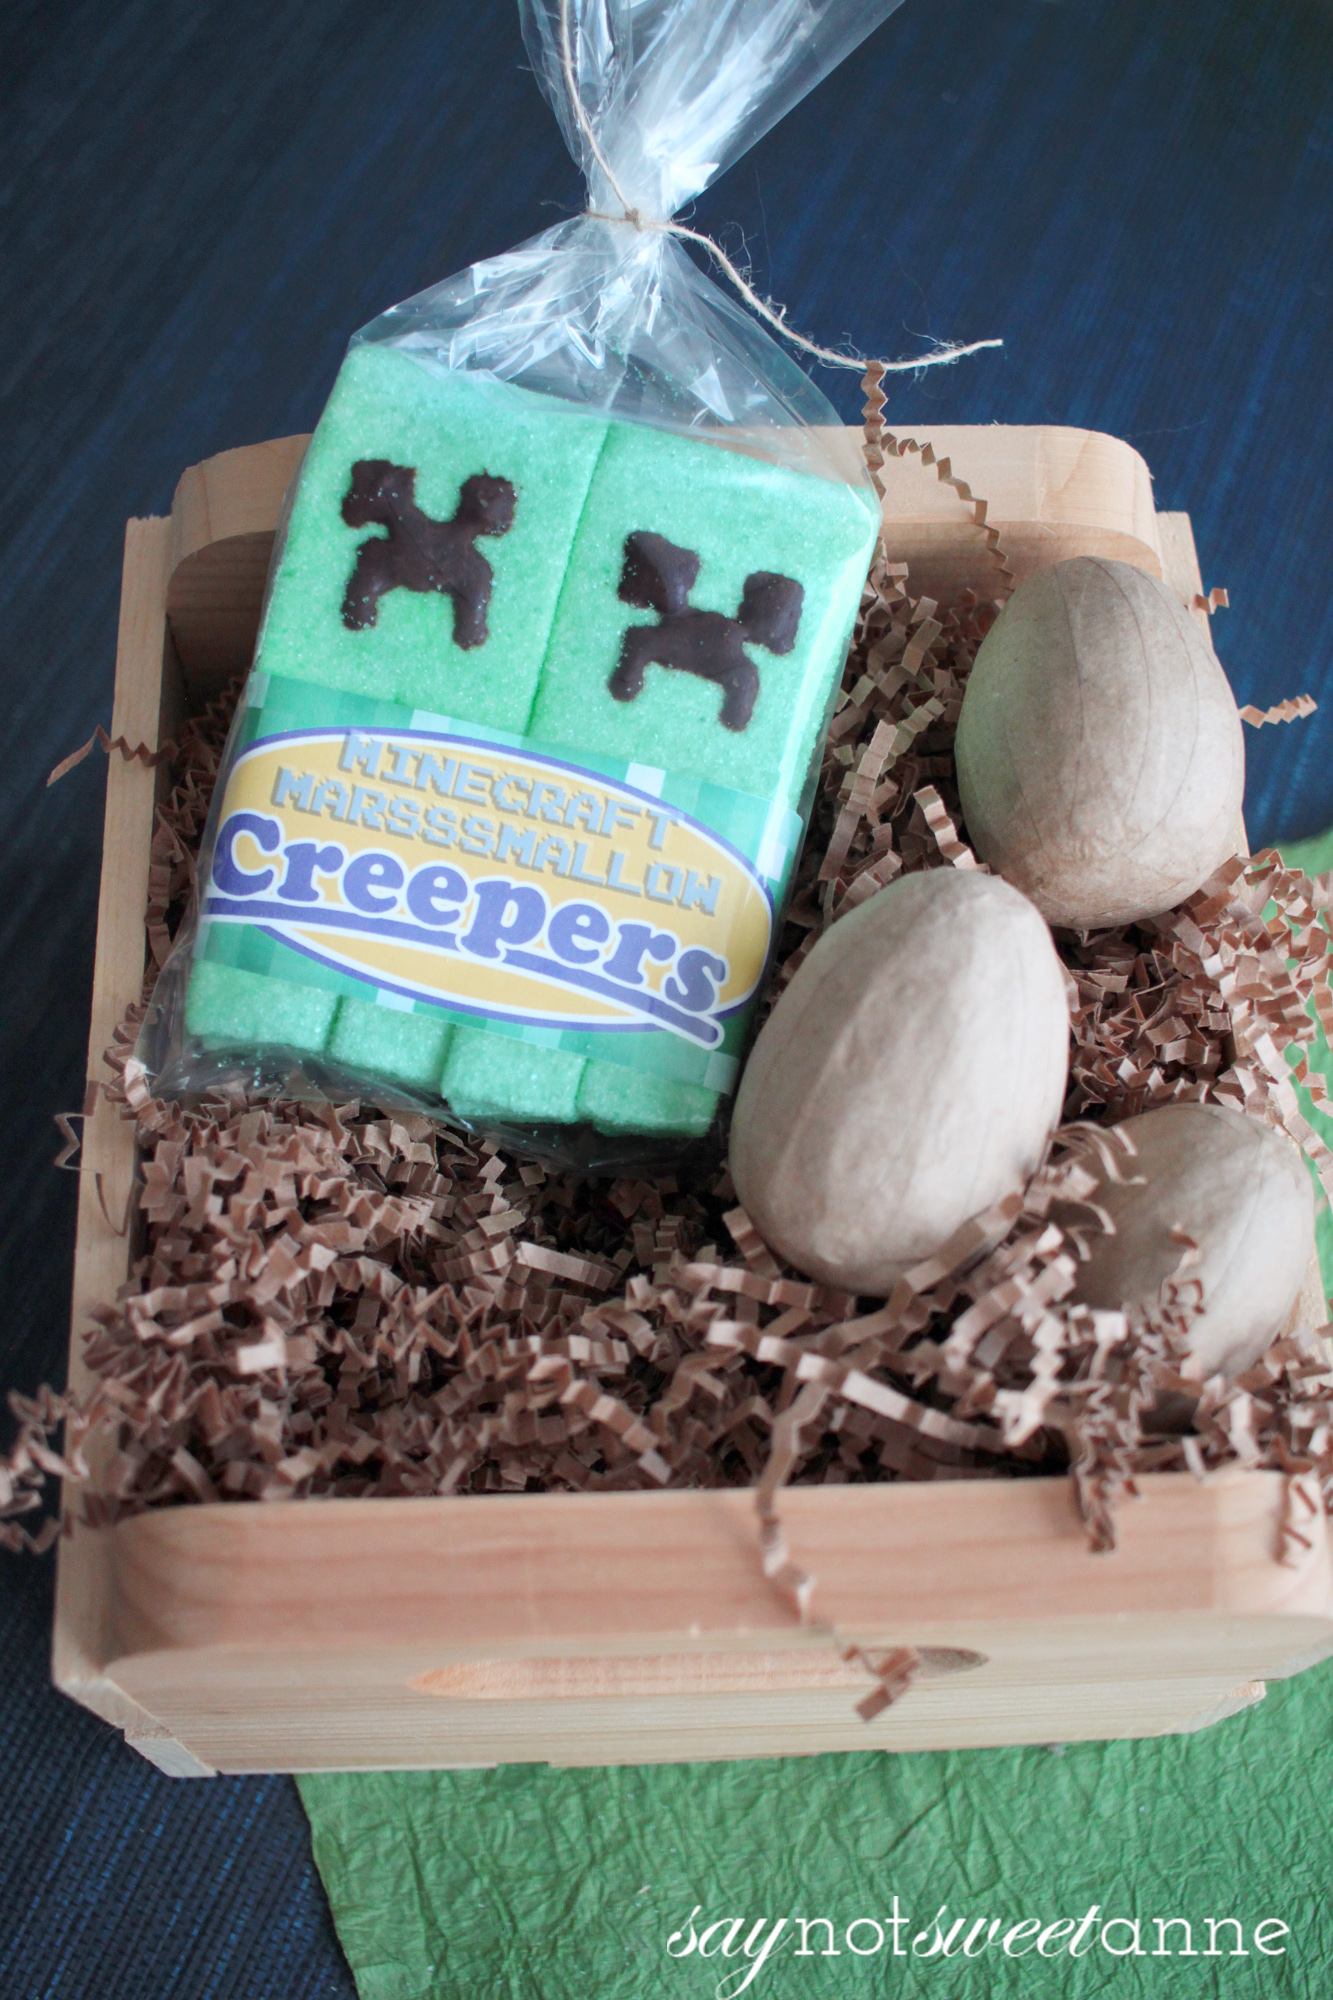
- Once your faces are done, you’re ready to package! I made a super cute label you can download here. Slip the creepers into a zip lock and either staple the label to the top, or tuck it in with them. Done!
These were so fun to make, I’m brimming with other themed ideas! I could see these at a Minecraft kids’ party, or just a special treat For the gamer in your life. They are too funny!
Kayla Domeyer
Latest posts by Kayla Domeyer (see all)
- Miniature Bohemian Style 1:12 Dollhouse Rattan Shelf - August 24, 2023
- How to Solve Stress with Princess Bathtub Melts - June 2, 2020
- 25 Valentines Even a Toddler Can Make - February 11, 2020
Out of curiosity, my son has ADHD so we really try to limit his sugar intake. Is possible to just dye the marshmallows green and avoid the sugar layer on the outside? Or does the outside stay too sticky without the sugar layer? I plan on making these with him regardless, just curious. Thanks for this awesome post!
You could in theory use cornstarch on the outside but – there’s already a lot of sugar in the marshmallow. Also, I’ve found because of the amount of air in the marshmallows, dying the mixture will not produce a vivid color. You’ll likely end up with off-white.
Let me know if you think of something!
Hi Kayla! I was wondering if the link to the printable is possibly broken. I’m having trouble getting it to load. I was hoping to use this really awesome idea for my kids’ Minecraft birthday party this weekend.
Sorry for the late reply Jenna! I’ve checked the link and it seems to be working. I hope you figured it out!
great stuff, thanks for sharing
Made these for my daughter for her class for Valentine’s Day. They are awesome. I had wanted to make marshmallows in general for a while now since getting my kitchenaid stand mixer and this was a great excuse to get on it. She loves minecraft. The marshmallow itself is great and her dad kept sneaking my test batch. Success. Thank you. 🙂
What a terrible prank! Thanks for finding a way to make these “real”!
I plan to use store bought marshmallows and just melt them and let them reset. I saw another site in which molds were used to make diffetent shapes, so I think it will work. I’m a little daunted by the idea of making them from scratch.
I think I’d like to try flavoring them, as well – maybe with mint.
I can’t wait to experiment with this and see how it turns out. I’ll do a trial run before making them for my ds’s birthday party.
🙂
Peggy – I thought it was a mean trick too!
Please report back on your success in melting store bought marshmallows. In my experience, the melting removes the air bubbles from the mallow and it re-solidifies more like a taffy. But Creeper taffy would be great too!
Can I use this for a class assignment?I’ll put something at the bottom of it saying you made the creeper peeps
What sweet class are you taking where Marshmallow Creepers are relevant!? And can I take it too!?
Seriously though, make as many as you want! I’d love if you directed people here to make their own!!
I’m not taking a class for it.It’s a homework thing!
I have no baking class it is elementary school homework!
I bet they will be a huge hit!
What a great recipe!! Thank you so much for sharing!! I ended up just doing heads on lollipops because I was worried the full body would be too much sugar for some parents, haha. My daughter is so psyched to give them out for her birthday this weekend!!
Can lime jello be used instead of plain gelatin?
Good question Heather! Unfortunately no. JELLO mix includes a lot of extra stuff like sugar. Its not just gelatin. There is no substitute for the gelatin packets I’m afraid.
My son is so excited to make these for a Minecraft cooking activity on diy.org. Thanks for making our day!
what can i replace the chocolate ganash with?
I’m not sure. Perhaps black frosting?
Thank-you sooooo much. My little girl is 8 tomorrow and reacts badly to artificial additives in her food. Minecraft is her world and on my bench are a fantastic batch of homemade naturally colored creepers for Saturdays party. They look so awesome.
Aww Penny, I’m so glad! I hope this makes a wonderful memory that your daughter won’t forget!
Kayla, this has been my most popular pin on Pinterest (over 3k repins). I make marshmallows every Christmas and discovered this last year, but never commented on how fantastic it is. Marshmallows can be a bit intimidating at first, but I love how you detailed the directions. This is by far my favorite marshmallow recipe. I love that it doesn’t require egg whites. I made them for my son’s Minecraft birthday last year. I used melted dark chocolate frosting for the face. This past Easter, they were a huge hit too. On some, I didn’t cut the legs, but inserted lollipop sticks and made Creeper marshmallow pops. The kids LOVED them. If you don’t want to make the entire batch into creepers (I made just enough for what I needed and had leftover marshmallow) cut into squares, coat one side with green sugar and the others with hot cocoa mix for Minecraft grass blocks. Those are yummy too.
I am so glad that you stopped by to tell me how well you liked it! I tried a bunch of marshmallow recipes before I settled on this one. It is easy, and I think the photographic step-by-step instructions help. Have a great day!
I made these as a test for my son’s birthday party that will be coming up soon. It was much easier than I thought and they looked just like creepers. Today I am making them for the actual day. I added more green food coloring to the heated part and the bodies were more green. Also, the first time I practiced cutting them and I realized that if I pressed the edges more than try to cut them back and forth, I had better results. Practice! Voilá!
I’m so glad it worked out for you! I hope everyone loved them. ;D You are SO RIGHT about practice, and about pressing down rather than sawing. Thats why I opt to use a piza cutter when I can.
Hi Kayla,
Thank you for such a cute and creative idea! (Direction seem pretty easy to boot! 🙂 )
Question on Step 3 (3.Set the green sugar aside, its time to start the marshmallows! Prep work is key here. Start by using a spray non stick coating to cover a 9×13 pan and the paddle of a rubber spatula. I also dusted the inside of the pan with green sugar. It turns out it wasn’t needed, and changed the texture of the marshmallow a little on that side. If doing it again, I’d omit that step.)
—- You mention that if you do it again that you’d omit that step. Which step were you referring to? Spraying it or dusting the pan with the green sugar? Or both? 🙂
Thanks! I can’t wait to try this for my son and daughter’s birthday party in a couple weeks!
~ heather
Good question!
I would omit dusting the pan with sugar. The spray is definitely needed to keep from sticking, but the sugar changed texture and I would advise simple dusting afterward. I hope that helps!
Hi, found your recipe and made these last night for my sons 12 th birthday, seems Minecraft birthdays are big in Australia at the moment. Looking at all the lollies I had bought, I was thinking, green sugar may just be a little much, so, I thought I might just add that I used coconut, mixed in the green turning it the same colour as the sugar and the best part, is it tasted great! Thank you for the recipe, loved making it and I my little one things they look awesome! Cheers
I just finished making these, I’m at step 10 and letting them sit. They have been sitting for about two hours and feel a bit soft. Not sure if the packets of gelatin were smaller than you used and that’s the problem. I’m making them for my son’s 7th birthday party tomorrow (minecraft theme).
Will let them sit a bit longer and see if they firm up more. Visually it looks like a similar amount of gelatin as in your picture if I was to guess.
Hope they come out, as these would be a huge hit.
Christopher,
I hope they turn out for you! What do you mean by “still soft”? As in, still just fluff? If that is the case, it’s more likely that the sugar didn’t reach temp. Did you use a candy thermometer?
If they don’t set, maybe dust the whole pan with sugar and paint the face on. Serve creeper fluff! I’ll monitor the comments for a while in case you have more questions!
Thank you so much for posting this! I thought it was such a cute idea and disappointed they weren’t really an item. So I took matters into my own hands and made these today for my son’s b-day party tomorrow. The hardest part was the faces. I used black gel in the tube, but used your toothpick trick. It’s just hard to get square edges but I don’t think my sons care…. can’t wait to see what their friends say!
I also only mixed mine for 6-7 minute (it’s been so cold here in the NE this year) and it worked out great. My only thing was my pan had such rounded edges I would have lost half the quantity to square them off properly, so mine really do look like angry Gumbies. 🙂
Thanks again! These were great and fun to make.
I wanted to thank you for sharing. I was going to try to post a picture of the creepers my 9 year old son made by following your blog.
Oh my I’d love to see them! Feel free to email me his creations at [email protected]!
Ok just tried to order the Creeps for my son’s bday..denied! Ugh! Found this tho! I don’t have a stand mixer, will a conventional mixer work? Thank you for your help!
Jennie,
I would think that a hand mixer with whipping blades would work. The issue is the length of time it will take. It took me over 10 minutes in my stand mixer. If you can hand mix for that long, and also slowly pour molten sugar into your metal bowl while also holding the mixer – you can do it!
You CRUSHED this. Seriously, I am giddy with affection, and making these for my kiddos Minecraft party right now.
Ha ha! I’m glad you love it so much! They ARE AWESOME!! Go make them! Now!
Omg this seems so wonderful, but I don’t have a candy thermometer! Such a thorn in my side when I see awesome recipes like this! I have regular marshmallows, is there any way I could just melt those down and add the sugar??
Kelse,
What a bummer. In short: no. Not at all. Existing marshmallows have already cured gelatin and whipped sugar in them. Melting them again would be like trying to dice up cooked egg into a cake. its not the same as starting with raw. =D Candy thermometers are pretty easy to find and not that expensive. Maybe its time to find one?
I got a sticky situation. I poured the suger /syrup stuff into the gelatin mix and its still a green sticky goop after stirred. Whys it like this? :\
Hey Micahlad,
Did you add it in a little at a time? It definitely needs to go in slow. Also, it needs to whip, not stir, and for along time. Mine took over 10 minutes!!
Oki will give these a shot… Maybe today, but have you considered selling them? I am so not crafty! Would love to purchase from you if you are interested? Planning ahead for my sons minecraft party.
Meg,
I’m so glad you like them, definitely give it a try! Unfortunately, I cannot sell anything with the creepers, as they are owned by MineCraft. Also, I don’t really have the time or space to make foodstuffs to sell. :/ but I promise its not hard! Give it a shot! How many people can say they made HOME MADE marshmallows!?
This might be a very stupid question, so I apologize in advance…sorry !!
I am trying to cut corners over here. lol. Could i just buy premade marshmallows (you know the real kind you toast at campfires….not the liquid form) and somehow make them green either by dye and / or your green sugar ? If so how can I make the green sugar stick ? I would just be making the face,not the whole body. Oh and one more thing what is heavy cream ? Cant you tell I am not as crafty as you ? Thank you so much for your brilliant idea and help my daughter just told me she wanted this theme for her birthday and I must admit this is the coolest thing I have seen !!
TLB,
Well, I’ve never done it the way you are suggesting- with store bought marshmallows. Those are covered in starch/powdered sugar to keep them from being sticky- so I bet the sugar wouldn’t stick to them. If you got them slightly wet it might… but then they might melt. :C
I urge you to consider making them from scratch. The making of the marshmallow is only 3 extra steps (ingredients in pan, ingredients in mixer, ingredients spread out to cool) and will really make the difference.
You could certainly save time by only doing heads, cutting the marshmallow into squares instead of the rectangles and cutting all the legs. That would be a real time saver!
And heavy cream is also called “Whipping Cream” its essentially just cream with a very high fat content.
Hope this helps!!
Ok thanks for the feedback!
Great idea! Just wondering what size packs of unflavored gelatin did you use? I don’t think I’ve ever bought unflavored gelatin so maybe it is only packaged one way? We are having a Minecraft party in about 2 weeks and I’ve already been making some other things, considering you cannot really buy party supplies for this theme…these will be perfect! Thank you 🙂
Melissa,
I’ve only known them to come in one size packet. I don’t have any in the house right now- so I can’t check! :/
hi
just wondering about how these ‘keep’ I want to make them in advance for my sons party in 1 week–i fig. peeps are wayyy older than that… but wondering if they will get gooey…? any experience? i want to make them now in case i need a couple of tries 😉 and i have limited time this week.
thanks
I’ve kept them about a week in a ziplock bag. A couple of times they were a little sticky on the back side. Since then I wait for them to cool completely, then store them with a brown paper bag piece in a larger bag. That seems to work!
Oh my word, you are going to single handedly make my son’s 11th birthday party a huge hit (If I can pull this off!) Thank you so much for the simple instructions and packaging idea and labels, seriously out of this world! Can’t wait to try making these, the boys are going to flip 🙂
Andrea recently posted..Autumn Apple Ring Pancakes & Maple Syrup
I totally feel you! I was dancing around the kitchen when I made them. They are so exciting!
Thank you for this. I surprised my 12 year old with these in his lunch. He loved showing them off. I loved the ease in making the marshmallow. I’ve tried before and there were more steps, more complications. These were simple and yummy, even though I forgot the vanilla. I will be using this marshmallow recipe from now on.
Robin,
I am SO GLAD to hear that it worked out for you. I’ve never tried any marshmallow recipe but this one, although I was afraid to try at first. I’m so glad your son loved them!! ♥
Hi Kayla,
Thanks for your reply~i figured that might be the case. Wish me luck, I’m gonna attempt to make these tonight for my son’s 10th b-day tomorrow! Thank you so very much for sharing!! 🙂
Good luck! Email me with any questions and I’ll do my best to help! I only made marshmallow the once, and it worked for me!
This might be a silly question…but is it possible to use store bought marshmallow cream for these?
K,
Mallow Cream never sets. Its always sort of soft, which is the main difference between mallo cream and marshmallows. So unfortunately, no. I’d think if you tried you’d end up with a mess that you couldn’t cut into bars at all. It would keep the consistency it has out of the jar. But I promise making the marshmallows is easy!
My son and I mad them this weekend. Super easy and cute! The only thing that I would suggest is if you are peep connoisseurs (as we are over here) I would cut the vanilla to 1/4 or 1/2 tsp and maybe add it sooner so it is more incorporated. I felt like some had a strong vanilla flavor and some didn’t. For our faces we cut out a stencil and colored it in with black food coloring. Thanks for the great post!
Just made these last night and they came out perfect! Didn’t have heavy cream on hand, so I just melted a Baker’s Square of Choc for the facial features. Thank you so much!
Ah! I’m so glad it worked for you! =D I can’t wait to hear how they went over!
Hi, these are so perfect for the minecraft party my son is having this weekend, and SO cute. I have a question though. After i mixed in the hot liquid to the gelatin mixture and mixed on high, I figured i have the same mixer as you, so i let it go for almost 12 minutes, but the mixture came out very stringy and very hard to smooth out in the pan. Should i have mixed it for less time?
I’m so glad you tried it! My guess is that maybe your house is cooler than mine? It sounds like your mallow cooled while it was still whipping? I’m certainly no marshmallow expert, but I would try again and watch it while it mixes.
Ok, i think i did it! Mixed it for about 7 minutes and they came out perfect into the pan. So i guess the colder it is in the house the less time it needs mixing. It’s about 72 degrees in the house. I’m not much of a baker, so it’s new to me. i just knew that i had to try to make these for my sons party since he is crazy over minecraft! Thank you for the cool recipe!
Oh my goodness that’s awesome!! I’m so glad it worked out for you. I’d love to see pictures of your party!! ♥
I made these this weekend and they were a HUGE hit. My kids (8 & 10) “host” an egg decorating party each year so I made these for their guests. The marshmallow is very easy to make. Just make sure your temperature is right at 240°. The most time consuming part was, of course, the legs and the face, but the kids went absolutely crazy for them. Thanks for posting this great recipe.
I’m so glad you liked them! I’m so glad they worked out for you and I totally agree about the faces. I wonder if I could make a stencil and use some spray food coloring to do them in bulk? Still- a totally fun projects am I right!?
These are awesome!! How many creepers does one batch make??
I’m glad you like them! It really depends on how you cut them. I would estimate between 16 and 22. Keep in mind they’re a bit bigger than peeps, so you might not want to give away too many. Sugar rush! 😀
Great idea!! My son would love these for his Minecraft party. Wondering how long they will keep, so I could make them in advance if possible. Please LMK… Thx!
Well, I made mine the weekend I posted them. Stored in a Ziploc they are still good today! I would say the danger is going stale and getting hard.
My husband would absolutely love these. I’m totally making them for his birthday, or for father’s day. Such a creative idea! Love it!
Brianna recently posted..The BEST Gluten-Free Mini Chocolate Cupcakes EVER! (filled with Salted Caramel and topped with Salted Caramel French Buttercream)
I think its hilarious that your hubby would love them! Mine’s a total video game geek too!
I was guilty last year of trying to buy these online! LOL! I am SO going to make these for my boy! Thank you so much!
my boys would LOVE these! (like many kids would!) you are a cool!!
michelle recently posted..Hula Bunny PEEPS and a Spring Hop Along PEEPS Party!!
What a fun idea! They look like they’d be perfect for Halloween, too! I’m pinning it.
Noreen recently posted..Bunny Money
Those are so great and adorable! I love them!
Shelan recently posted..Salted and Peppered Caramels (Recipe)
These are simply super cute!!
Winnie recently posted..עוגת שוקולד דובדבנים ללא קמח
My boyfriend and I are totally geekin’ right now!!!! So amazing!
Jody Kristina recently posted..Polka dots and stripes
Ha! That’s how I felt the whole time I was making them!
haha so neat! Oh my gosh they could also be Gumby peeps!! ahhh love! haha
Angie @ Big Bear’s Wife recently posted..Sun-Dried Tomato Chicken Orecchiette {Pasta}
You’re so right! I actually told my hubby they looked like Gumby with only the 2 legs, so I had to make 4 like in the game!