 Well, its not even Thanksgiving and here in Michigan we’ve seen sleet, hail, and snow all in the past 2 weeks. I, for one, am excited! Snow is one of my favorite indicators that the Holiday season is upon us. I’ve even got some superstitious “Snow Earrings” that I wear to coax the clouds into letting down the fluffy white stuff. 😀
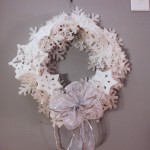
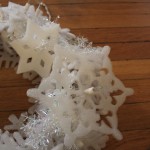
So, After seeing this AMAZING snowflake-esque doily wreath by the Crafts Dept. at Martha Stewart, I thought I would make one of my own. I headed off to find some paper doilies at the local dollar store. I found some. They were square. In the midst of my pouting, my ever-observant Hubby saved the day by spotting a set of foam snowflakes for a dollar. They are sold in 3 designs and they were perfect! I gathered my materials and got to it.
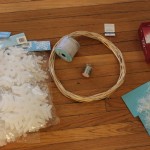
You Will Need:
- Some sort of Wreath Base (mine is from the dollar store)
- A strand of white lights with a white cord. (After experimenting, I recommend a 50bulb string that uses batteries. That way you don’t have to bother plugging it in.)
- Some medium gauge wire
- 6 or so packs of the foam snowflakes
- 2 packs of sparkly snowflake ornaments
- Ribbon, if desired.

How To Make It:
- Paint the wreath base white if needed. I left mine the pretty birch color and it looks great.
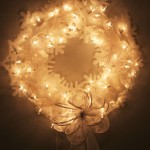
- Wrap the white lights around the base. Be sure to leave the plug-in end (If you aren’t using the battery powered kind) loose at the bottom.

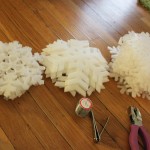
- The snowflakes actually come in a couple different designs. Separate out your designs so that you can mix them in together. That way you don’t accidentally end up with half your wreath covered in one kind, and the other half in another.

- Using whichever snowflake design you have the most of, or a combination of them all, create a base layer of snowflakes on the wreath base. Use the wire to wrap around the base layer and secure.

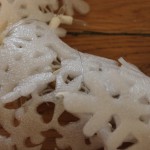
- Take your time and poke as many of the lights as you can up through the base layer. (This is actually pretty easy because the snowflakes have a lot of holes!)
- Layer the remaining snowflakes to create a visually appealing design, poking lights through their centers in order to hold them in place. Be sure that you poke the light all the way through so that the light base is what is touching the snowflake- not the light bulb. You might have to cut some of the flakes down to make smaller flakes. I found that the top layer looked better as smaller flakes.

- Use a hot glue gun or more wire to anchor some of the glittery snowflake ornaments on the top layer.
- If desired, make a bow and use the wire to secure it in place.


Kayla Domeyer
Latest posts by Kayla Domeyer (see all)
- Miniature Bohemian Style 1:12 Dollhouse Rattan Shelf - August 24, 2023
- How I made a DIY Prop Dragon Book (Twice!) - March 20, 2023
- How to Solve Stress with Princess Bathtub Melts - June 2, 2020
This looks GORGEOUS!! Love it! I wanted to invite you to link up at TGIF http://livinglifeintentionally.blogspot.com/search/label/Linkey%20Parties or come on by to try and grab one of the Guest Poster spots I’m offering up. Have a GREAT Thanksgiving!!
Beth =-)