Whoa. Things are getting real. Real small.
In my 8 years here on the blog my crafting has run a weird and delightful gambit of concepts. It started mostly with printables like the DIY Advent Boxes, and then morphed into some recipes like Strawberry Cheesecake Fudge. Along the way we touched on renovation and DIY with the DIY Fireplace and my parenting journey through Teethers and Printed baby blankets. There were some pretty popular beauty crafts like DIY Healthy Moisturizer, and the ever-present Printable planners. We’ve made so many gifts for my beloved husband (Like these hubby approved items), and my mom (Sentimental Keurig Kcups), and my friends (Cookies in a jar to be sent overseas).
But we’ve never gone tiny.
Until the past year.
You might have noticed that my posting has been… ahem… irregular to say the least. There really isn’t any big reason for that. My Squish is amazing and even more manageable than he ever was. I’m expecting baby #2 but this pregnancy has been way easier than the first. So it isn’t as if I haven’t been crafting. I just haven’t been sharing my crafts.
Why? Well, because I didn’t think they fit. I mean, we’ve always tackled projects here that would fit almost any person’s life or style. Nothing was too niche or specific. My main reasons for having the blog in the first place was to bring crafting to the masses, to inspire people and help them create things. And this miniature stuff isn’t everyone’s cup of tea.
But you know what?
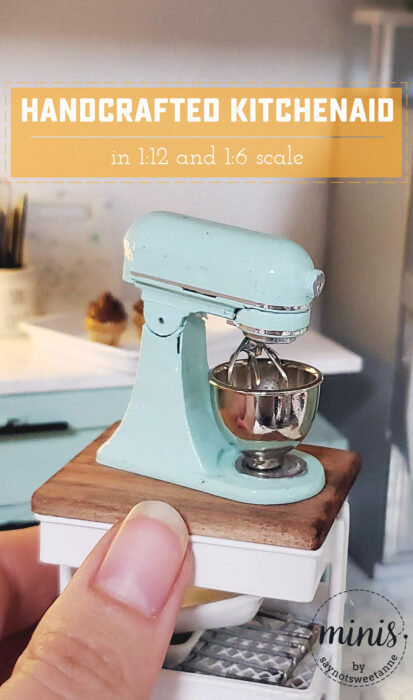
I’ve gotten pretty darn good at some of these things, and I think they are beautiful! So I’m going to share them. Some will be official tutorials and others will be more show and tell. I hope you enjoy being here on this Incredible Journey into a Miniature World! And first thing is first – check out this Hand Made Miniature Kitchenaid Mixer!
Let’s define a couple of terms here before we get going. 1:12 scale means that 1 inch in my miniature world is the equivalent of 12 inches in the real world. So if something is 3ft tall in reality, it would be 3in tall in 1:12 scale. This is the most popular dollhouse scale but is hardly ever seen in actual dolls (go figure!).
Conversely, 1:6 scale means that 1 inch in the mini world would be the equivalent of 6 inches in the real world. So our 3ft real-world object would be 6 inches tall in 1:6 scale. This is Barbie scale, and probably a proportion you are familiar with. A 12 inch doll in 1:6 scale is the equivalent of about a 6ft person.
What I used:
- Monoprice Mini Select 3D Printer
- Tinkercad
- Bondo (the kind for cars)
- Sandpaper of various grits (from 150-600)
- Filler Primer in white
- Finish paint in blue high gloss Rustoleum
- Nail striping tape
- Molotow Liquid Chrome/ Molotow Liquid Chrome Pen
- Light wire for the whisk
- Polymer Clay
- 2 Part Silicone Mold Putty
- UV Cured Resin
How I made it:
- First thing’s first. I made these little guys (one in 1:12 scale and one in 1:6 scale) using my 3D printer. I have a Monoprice Mini Select. I used Tinkercad to tool a mesh I bought until I was able to print it. Unfortunately, I cannot share the 3D printable file with you all because the mesh I bought does not allow redistribution. For that reason, this post is less of a tutorial and more of a show and tell. I promise I don’t make many things on my 3D printer, so please don’t think you’re out of luck in that regard.
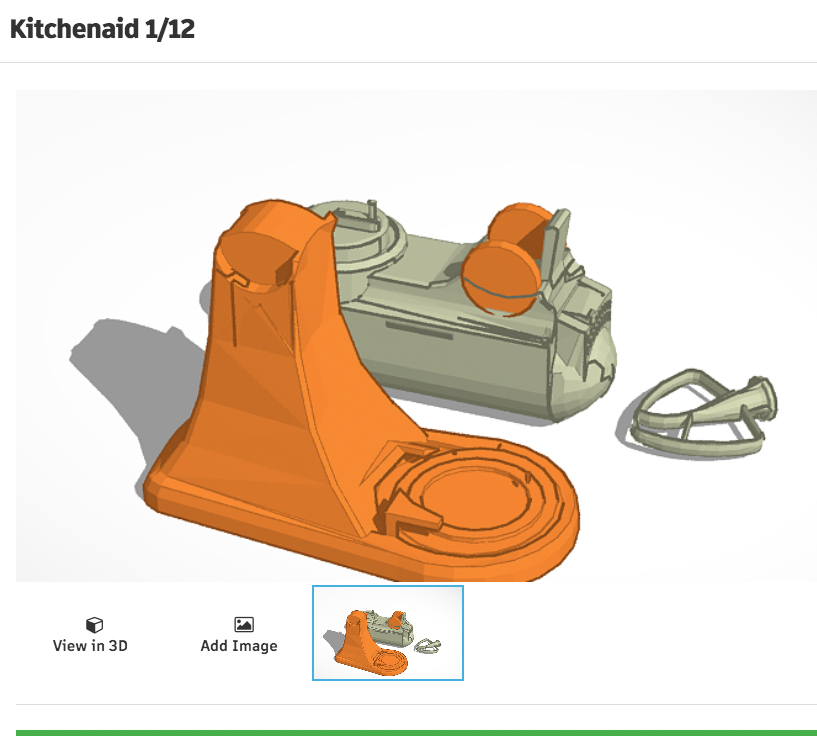

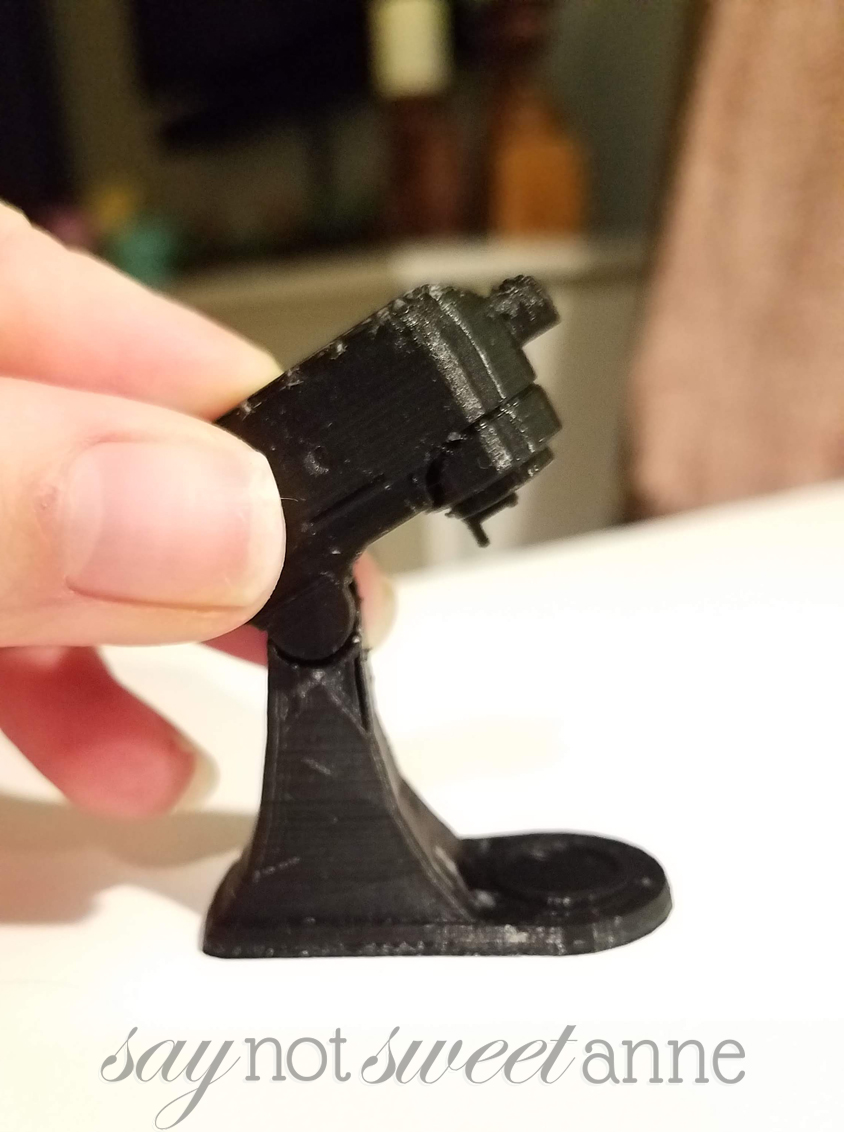
- When the model comes off the printer, it is in rough shape. You can see that in the above pictures. Printing in 1:12 or even 1:6 is so small, that some of the tollerances can’t be printed. That leaves gaps in the finished model. The first thing I do is cut or sand off any sharp printing artifacts, then fill in any gaps with bondo and let that dry for a few days.
- Once the bondo is dry, it is time for more bondo! I do a thin coat all around the model, smudging it in with my fingers. As you can see in the printed models above, there is often a grain that is visible. I don’t want that in my finished mixer. I sand that bondo smooth and I’m ready for articulation.
- It was too hard to try and make the mixer open and close as it was printed. Instead, I drilled a hole in the hinge area using a fine drill bit. Then I press fit a wire into that hole to serve as a hinge. It works beautifully! I tried it two ways on the two scale items. I like the articulation of the 1:12 model better.
- After bondo and hinge, it is time for priming and painting. I used 2 light coats of a filler primer, just to make sure everything was super smooth. I let the coats dry for a day and lightly sanded with 600 grit sandpaper in between.
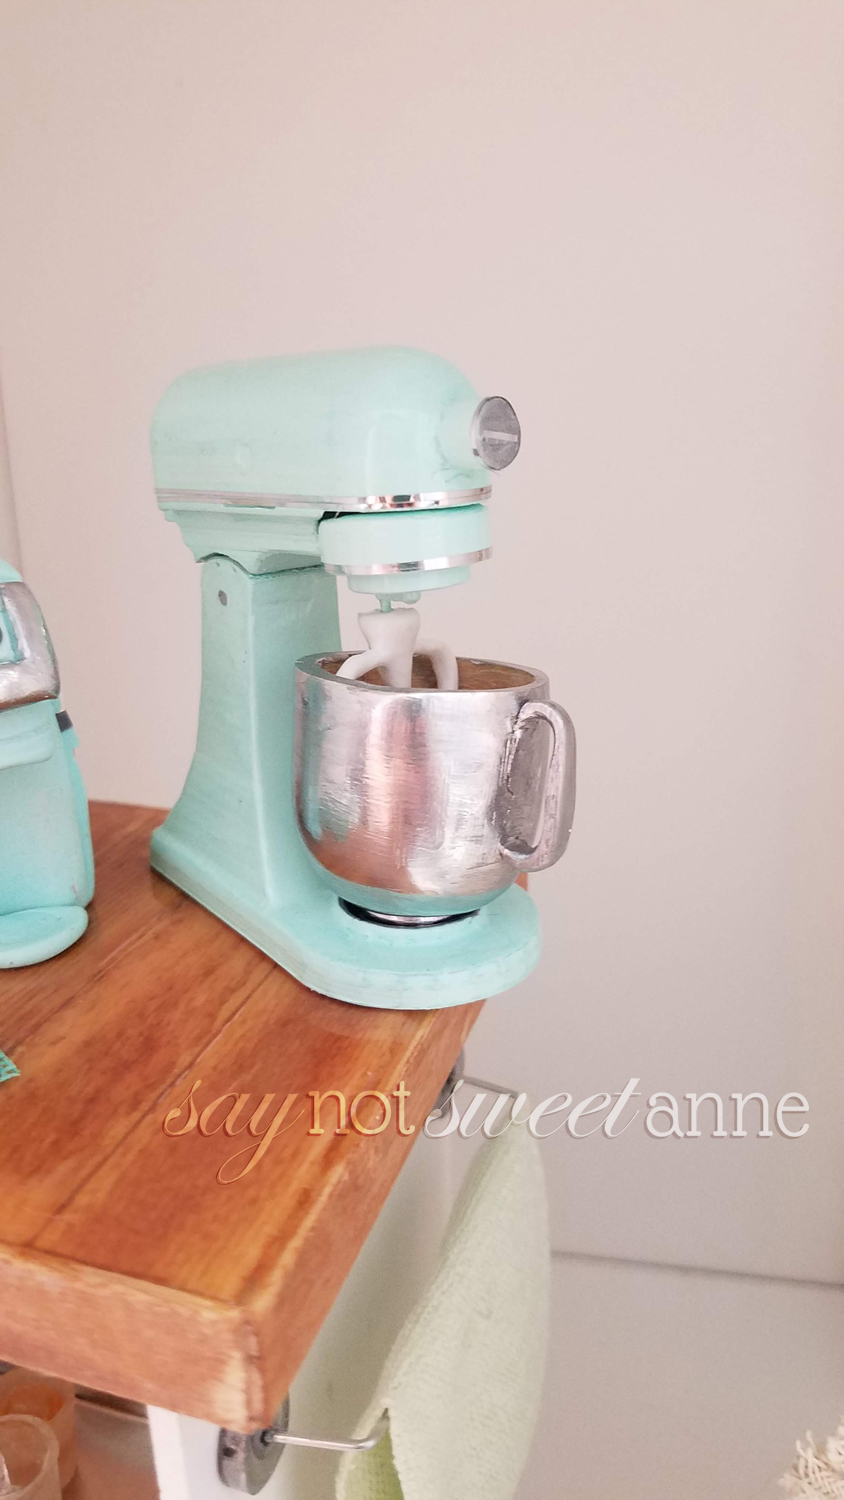
- After primer I went with a gorgeous blue color in a high gloss for the final coat. I let that dry at least 2 days to cure before going at it with the chrome finishes.
- For the chrome, I used two different elements. The chrome stripe on the motor area of the mixer is actually nail striping tape! It was absolutely perfect in sheen and size, plus way neater than if I had tried to hand paint that thin line. I would highly recommend that stuff! For the chrome tray where the bowl rests, and the front adapter where attachments can go in the mixer I used a Molotow Liquid Chrome Pen. I got this tip from a diorama club on Facebook. It is the most realistic chrome paint I’ve ever used.
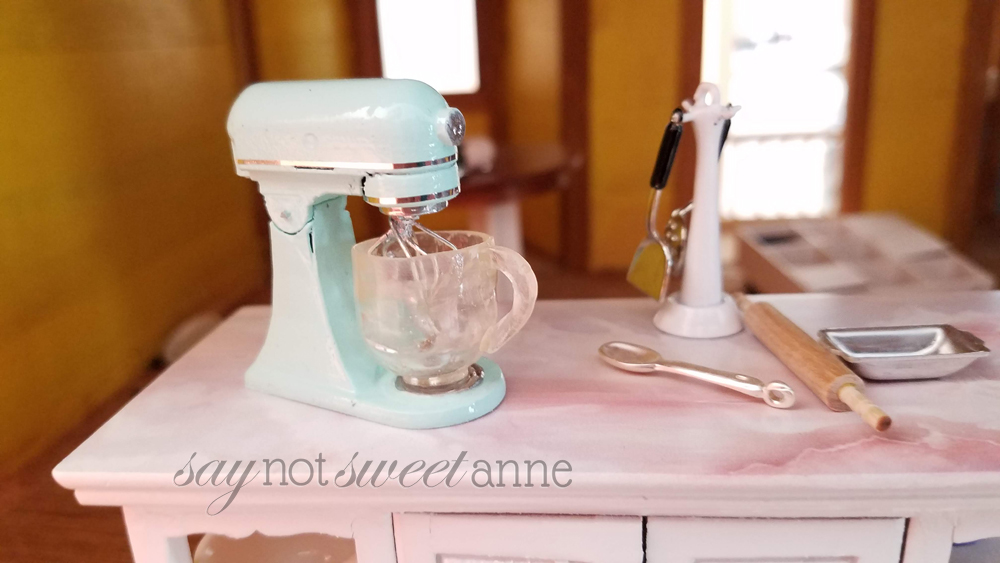
- Okay, so the mixers were all pretty and painted before I decided I needed to tackle the bowl situation. I tried and tried to find a fitting, a store bought mini bowl, or anything that could approximate the metal bowl of a Kitchenaid. In the end, I made it myself. First I sculpted a bowl for the 1:6 mixer out of black Polymer clay (this is the kind of stuff that you bake in the oven). It turned out alright after I hit it with the chrome paint, but I feel like it could have been better.
- So for the 1:12 model I used the same technique for creating the bowl, but I made a mold of it instead of painting it chrome. I use a molding putty that is super easy and quick. Then I used some UV cured resin in the mold and voila! A clear bowl that looks much more like a glass mixer bowl. I was satisfied at the time, but I’m still on the lookout for a stainless bowl that I can make work.
EDIT: Later on I found a metal bowl in a mini shop that looked like the perfect size – so I use that most of the time instead of the resin one!

- Finally, the whisk and paddle. I made both of these using a similar technique – wire! The paddle I made out of wire at first, and then I dipped that wire in resin, cured it, dipped it again, cured it etc. This layering of thin resin built up on the wire until it had the right thickness to be a paddle.

- For the smaller mixer, I used wire to make a whisk instead. I just twisted 3 loops of wire, then glued them all together at the base. Then I glued them into the mixer. No big deal!
Whew! Thanks for following along on my mini-rant (ha!) and don’t worry, I’ll have lots of other non-mini crafts coming, as long as 3D printer free miniature tutorials.
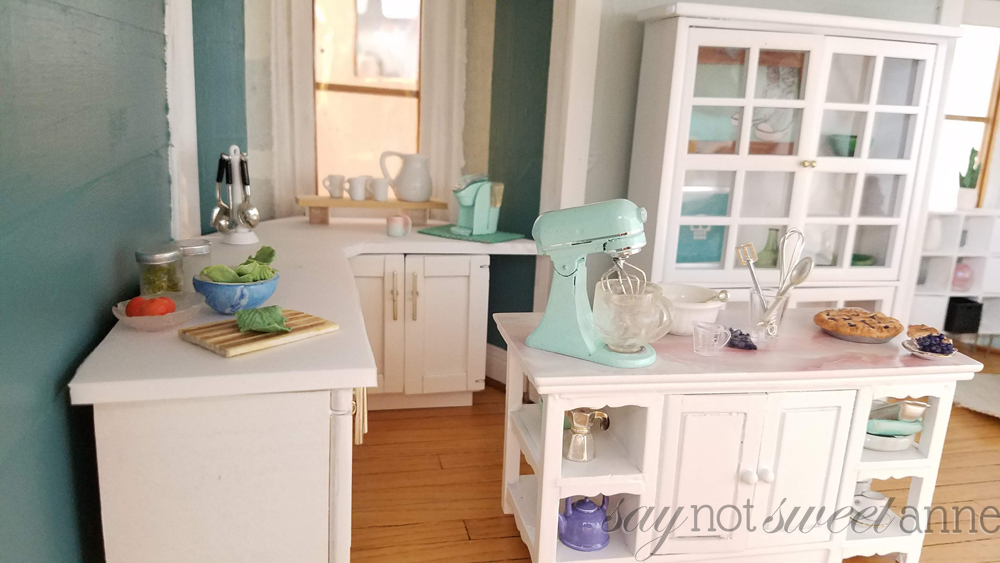
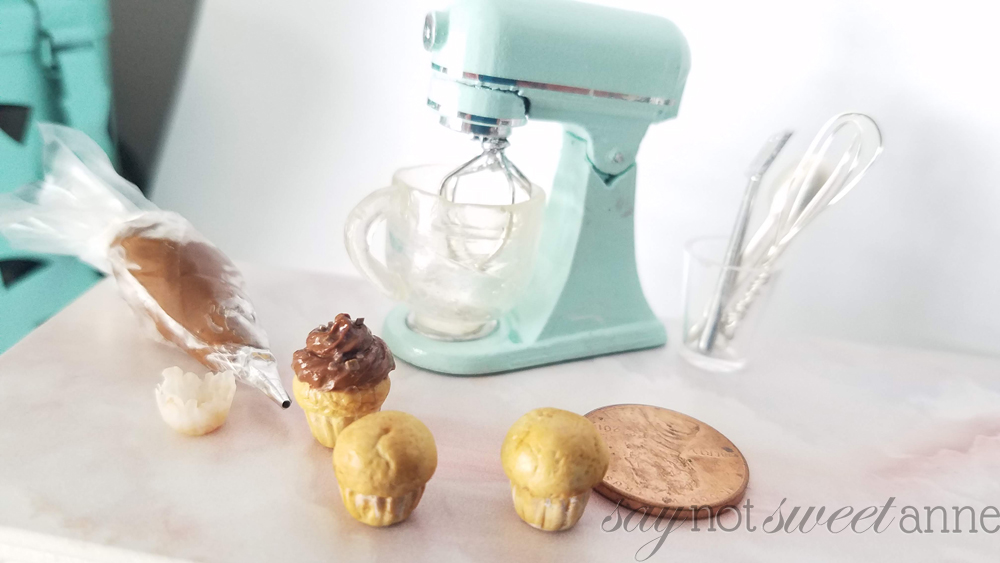
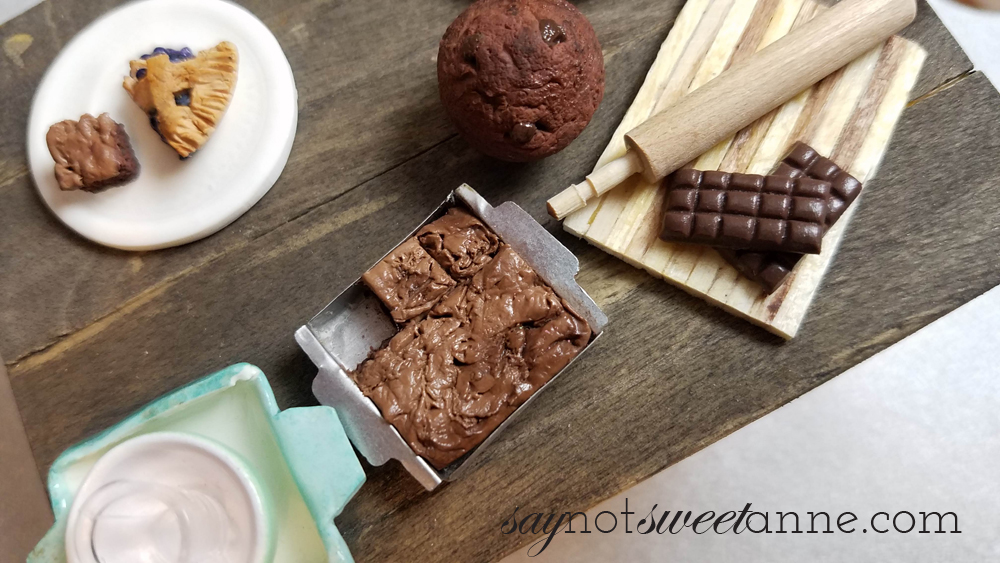
Oh, and what are mixers for if you don’t bake with them!? ;D
Kayla Domeyer
Latest posts by Kayla Domeyer (see all)
- Miniature Bohemian Style 1:12 Dollhouse Rattan Shelf - August 24, 2023
- How I made a DIY Prop Dragon Book (Twice!) - March 20, 2023
- How to Solve Stress with Princess Bathtub Melts - June 2, 2020
Oh my gosh these are adorable, what a fun idea! I would love to ad one to my 1:24 scale dollhouse!
I’m in love with this little kitchen aid and have enjoyed the tutorial! Thanks so much for explaining how to make this step by step 🙂 I hope to get to it soon, so much miniatures to make still!
Hello, How much would it be for a 1/6 scale mixer? Thank you for your time, Sam
This miniature Kitchen Aid is amazing! Do you sell them? I would love a few I’m 1:6 size. I am just starting to make 1:6 miniature foods and some basic furniture. I love crafts like this. Thank l you for sharing!
Thanks Karen! I haven’t sold any as there are plenty available in 1:12. But if you are looking for a 1:6 I could definitely thing through the material and time costs of that. Send me an email and we’ll chat!